
If I’m being honest, discovering Chocolate Kataifi Bark was a little serendipitous for me—one of those “let me just try this and see what happens” moments in the kitchen that turned into an absolute family favorite. I remember the first time I combined the crispy kataifi texture with rich chocolate and nuts; the crackling sound as it cooled down was almost as exciting as the first bite! There’s something magical about how the crunchy, thread-like kataifi pastry provides the perfect contrast to the smooth, bittersweet chocolate that brings it all together. This Chocolate Kataifi Bark isn’t just another chocolate bark recipe—it’s a kataifi pastry dessert that carries with it a heritage feel but is so easy to pull off at home.
Now, confessing here, I was a little nervous the first couple of times I made this easy chocolate kataifi because kataifi pastry can be tricky—it’s so delicate and quick to dry out. But once I nailed the technique, this dessert became my go-to “wow” treat during busy weekdays or last-minute gatherings. My family loves it, especially the kids, who always ask why the chocolate is so crunchy and nutty in the best way possible. It’s like a little treasure hunt when they bite into bits of crispy kataifi texture mixed with their favorite chocolate and nuts.
This recipe fits so well into our busy family life. Whether it’s a quick afterschool snack or a special holiday treat, the Chocolate Kataifi Bark hits the spot without requiring hours in the kitchen. The first time I perfected it, I was juggling dinner prep and helping with homework, so I get how chaotic life can be. That’s why this chocolate bark recipe is such a keeper—it doesn’t demand perfect conditions or fancy tools, just a little love and patience.
If you’ve ever been hesitant about working with kataifi pastry, or thought chocolate bark recipes were out of reach, I’m here to tell you this Chocolate Kataifi Bark is doable and delightful. And by the way, if you want to see a fun take on chocolate paired with bananas, you might like my Chocolate Banana Bark recipe — something about chocolate and nuts just feels like comfort, right? Or if you’re in the mood for some chocolate with a twist, definitely try the Chocolate S’mores Cupcakes.
So grab a cup of coffee, pull up a chair, and let’s dive into making your very own Chocolate Kataifi Bark. I promise, once you take that first bite, you’ll want to make this crispy kataifi texture magic again and again.
Ingredients
When it comes to making the perfect Chocolate Kataifi Bark, having the right ingredients is key. I always use fresh kataifi pastry to get that unmistakable crispy kataifi texture—it’s worth seeking out quality kataifi pastry dessert dough rather than the frozen stuff because the difference shows in every bite. You can usually find kataifi pastry in specialty Mediterranean or Middle Eastern grocery stores, but if you’re having trouble, online stores also carry it. A tip I picked up from a friend is to keep the kataifi pastry tightly wrapped with plastic wrap to prevent it from drying out before using it.
Here’s the full list of what you need:
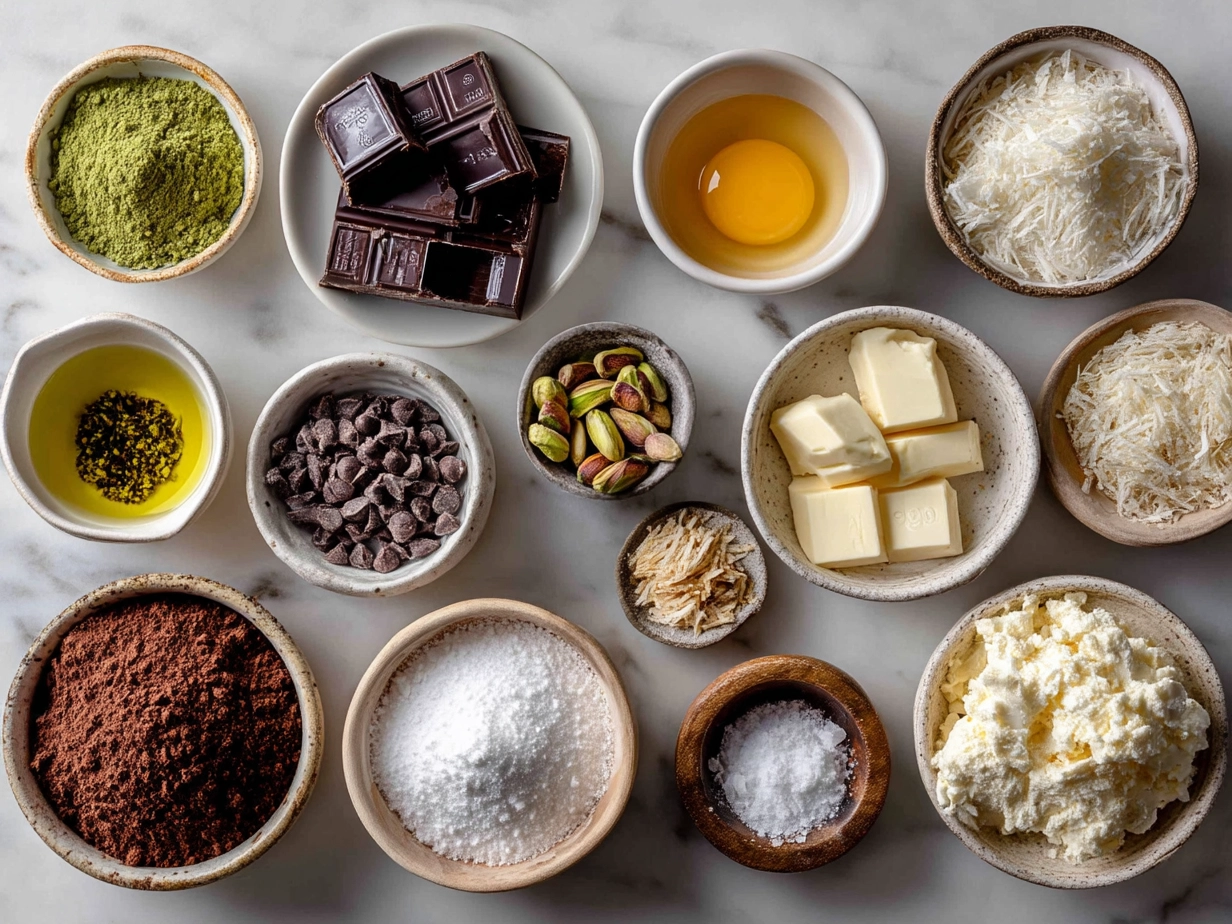
- 200g kataifi pastry (kataifi pastry dessert dough), thawed if frozen
- 200g semi-sweet or dark chocolate, chopped
- 1/2 cup mixed nuts (like pistachios, walnuts, almonds), roughly chopped
- 1/4 cup unsalted butter, melted
- 2 tablespoons honey or golden syrup
- A pinch of sea salt
When picking chocolate for your Chocolate Kataifi Bark, I prefer at least 60% cocoa for a nice balance between sweet and slightly bitter. That punch of dark chocolate contrasts beautifully with the kataifi. And the nuts? That’s your chocolate and nuts magic—choose a combo you love. My family is partial to pistachios and walnuts, which add flavor and crunch without stealing the spotlight.
One trick I learned from my mom when making this Chocolate Kataifi Bark is to lightly drizzle the melted butter and honey mixture over the kataifi strands before baking. It helps the kataifi crisp up evenly and adds just the right touch of sweetness. Believe me, this little step makes a huge difference! Also, if you’re short on time, prepping your nuts the day before and storing them in an airtight container saves you a few minutes when you’re ready to assemble.
If you’re budget-conscious, kataifi pastry and quality chocolate can add up, so don’t hesitate to shop sales or buy from warehouse stores for your nuts. Leftover kataifi pastry should always be refrigerated tightly wrapped to prevent drying out, and if you have any leftover chocolate or nuts, they keep well sealed at room temperature for a couple of weeks—perfect for your next easy chocolate kataifi adventure.
By the way, while you’re stocking up on ingredients, you might find shopping tips and inspiration for chocolate bark recipe variations over at this wonderful Mediterranean-inspired site (Dubai Chocolate Bar Recipe | The Kitchn) — some ideas here might just spark your creativity for your own Chocolate Kataifi Bark version.
How to Make – Step-by-Step
Alright, now onto the fun—making this Chocolate Kataifi Bark together. Don’t worry if this is a new one for you; I promise, it’s easier than it looks, and I’ll share all my tried-and-true kitchen secrets along the way to clear up any doubts!
- Preheat your oven to 350°F (175°C). Line a baking sheet with parchment paper—this keeps your kataifi pastry from sticking and makes clean-up a breeze.
- Gently separate the kataifi pastry strands. Kataifi pastry can clump if not handled carefully. Fluff it with your fingers so it’s lovely and airy—that’s the secret behind that crispy kataifi texture everyone loves.
- Mix the melted butter and honey in a small bowl. I’ve learned the hard way that the butter must be just warm, not hot, or it’ll start cooking the chocolate later.
- Spread half of your kataifi pastry in an even layer on the baking sheet. Drizzle half your butter-honey mixture evenly on top — this step encourages golden, crispy edges. Bake for about 10 minutes or until it starts looking golden.
- Remove from the oven carefully — your kitchen will start to smell like heaven at this point! Spread a layer of chopped chocolate evenly over the baked kataifi base while it’s still warm. The residual heat will soften the chocolate a bit, helping it to meld perfectly without running.
- Sprinkle your chopped nuts generously over the melted chocolate. This crunchy chocolate and nuts combo is what transforms this into a dessert to remember.
- Add the remaining kataifi pastry on top, then drizzle the rest of the butter-honey mixture. Return it to the oven for another 10-12 minutes until the top is golden and crispy.
- Once out of the oven, sprinkle a pinch of sea salt over the top. Trust me, it cuts through the sweetness and brings out all the flavors brilliantly.
Here’s a tip: I usually let the Chocolate Kataifi Bark cool at room temperature for about 30 minutes before slicing. This waiting game makes the chocolate set perfectly and the kataifi stay crisp. If you’re in a rush, popping it briefly in the fridge helps too, but be careful not to let it get soggy from condensation.
While the Chocolate Kataifi Bark is baking, I like to clean up the kitchen or start setting the table for when the kids come running in. Your kitchen will be filled with that intoxicating aroma of buttery kataifi and rich chocolate, making the wait worth every second.
If you’re interested in some more in-depth tips on working with kataifi pastry or handling chocolate like a pro, I found this external Dubai Chocolate Bar Recipe | Viral Knafeh & Pistachio super helpful for texture tips and ideas similar to our Chocolate Kataifi Bark.
Also, if the layering and timing feel a little tricky, I’d encourage you to check out some troubleshooting advice on a favorite chocolate caramel dump cake recipe here (chocolate caramel dump cake)—it helped me understand balancing moisture and crispness, which is key for this kataifi pastry dessert.
By the end of these steps, you’ll have that irresistible combination of crispy kataifi texture and rich chocolate and nuts, ready to enjoy!
Serving
The first time I brought the Chocolate Kataifi Bark to a family get-together, it disappeared faster than I expected, and I learned quickly—it’s best to keep a backup batch ready because the kids absolutely love it as an afterschool snack.

We usually serve it in bite-sized pieces alongside a big pot of tea after dinner, but it also shines at holiday parties, casual weekend brunches, or even as an indulgent coffee break treat. If you want to create a little spread, I recommend pairing the Chocolate Kataifi Bark with fresh fruit like figs or citrus segments—something light and juicy cleanses the palate beautifully between those crispy, chocolatey bites.
For presentation, I like to scatter extra chopped pistachios and a little dusting of powdered sugar on top just before serving. It adds a bit of festive flair without extra work. If you’re hosting, cut it into random shards rather than neat rectangles—something about that rustic look makes it even more inviting.
If you ever find yourself with leftovers (rare, but it happens!), Chocolate Kataifi Bark keeps well in an airtight container on the counter for several days. I sometimes crumble it into vanilla ice cream or Greek yogurt for a textured dessert twist. Another favorite trick is to gently warm chunks and serve over whipped cream for an easy, fancy dessert that guests rave about.
Seasonally, I’ve played around by adding a sprinkle of cinnamon or orange zest into the nut mixture, which adds a cozy autumn vibe perfect for chilly evenings. For a festive holiday take, try mixing in dried cranberries in the nut layer—my family went nuts for that one!
My friends always ask for this Chocolate Kataifi Bark recipe after tasting it, and they’re usually surprised how easy it is to pull off. I’ve found that this dessert really fills that niche between fancy and approachable, so it’s perfect whether you’re a seasoned home baker or just looking for an easy chocolate kataifi fix.
If you’d like more ideas on pairing and presenting desserts like this one, this post on the season of giving (Facebook link) is a wonderful inspiration for homemade sweets gifting.
FAQs
1. Can I use frozen kataifi pastry for Chocolate Kataifi Bark?
Yes! I always use frozen kataifi that’s fully thawed before baking. Just make sure to thaw it slowly in the fridge overnight to prevent it from drying out. It’s best to fluff it well before assembling your bark.
2. What’s the best type of chocolate for this chocolate bark recipe?
I prefer semi-sweet or dark chocolate with at least 60% cocoa. It balances the sweetness and pairs so well with the nuts and crispy kataifi texture. Of course, you can customize with milk chocolate if your family prefers it sweeter.
3. How do I get the kataifi pastry to stay crispy and not soggy?
This was a game-changer for me: lightly drizzling melted butter and honey mixture helps kataifi crisp up beautifully. Baking in layers and not overpowering with too much liquid keeps that fantastic crispy kataifi texture intact.
4. Can I swap nuts if someone is allergic?
Absolutely! Sunflower seeds or pumpkin seeds work great as nut alternatives, and they still bring that crunchy chocolate and nuts feel. I’ve also tried mixing in dried coconut flakes for added texture.
5. How long does Chocolate Kataifi Bark keep?
In an airtight container at room temperature, it stays fresh for about 4-5 days. Beyond that, the kataifi might lose some crispness. Refrigeration is possible but watch out for moisture.
6. Any tips for a beginner making easy chocolate kataifi for the first time?
Yes! Work gently with kataifi—think of it like handling delicate noodles. Also, don’t rush the cooling time after baking; that’s when the magic of texture really sets. And if you want a failsafe chocolate bark recipe as a fallback, try my chocolate caramel dump cake for a similarly satisfying treat.
7. Can I add other flavors or spices to Chocolate Kataifi Bark?
Definitely. I’ve added cinnamon, orange zest, and even a hint of cardamom for a spiced version. And if you love a bit of saltiness, don’t skimp on finishing with sea salt—it brings the whole thing together. For ideas, the Dubai Chocolate Bar Recipe | The Kitchn shows some creative flavor combos you might enjoy.
You know what I do when my Chocolate Kataifi Bark starts running low? I start planning the next batch immediately—nothing beats that crispy kataifi texture paired with chocolate and nuts.
My Final Thoughts
This Chocolate Kataifi Bark recipe is more than just a sweet treat in our house; it’s a reminder of those moments when I get to slow down and share something homemade that everyone truly enjoys. The crispy kataifi texture combined with the deep, rich chocolate and nutty crunch keeps us coming back for more, whether it’s a quiet evening snack or a centerpiece at our holiday dessert table.
My Chocolate Kataifi Bark Pro Tips:
- Always fluff the kataifi pastry gently before layering to get that unbeatable crisp.
- Use a mix of nuts—pistachios, walnuts, and almonds offer the best combo of flavor and crunch.
- Drizzle the butter and honey evenly—it really seals the deal on the crispy kataifi texture.
Over the years, I’ve tried a few variations: a spiced version with cinnamon, one with orange zest and dried cranberries for holidays, and even a nut-free one using toasted coconut for my cousin. The kids love the orange-cranberry twist, while my husband swears by the original chocolate and nuts combo.
I encourage you to make this Chocolate Kataifi Bark your own. Experiment with flavors, nuts, and even presentation. My hope is you find the same joyful “aha!” moments in the kitchen that I did, and that this recipe becomes a beloved staple for your family as well.
If you enjoyed this, you might also love my take on Chocolate Banana Bark or the fun Chocolate S’mores Cupcakes—chocolate and nuts never looked so good or tasted so comforting.
Thanks for spending this time with me in the kitchen. I can’t wait to hear about how your Chocolate Kataifi Bark turns out!
Happy baking, friend.
Chocolate Kataifi Bark
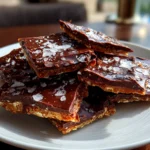
Chocolate Kataifi Bark combines crispy shredded kataifi pastry with rich melted chocolate for a decadent and crunchy dessert that’s perfect for any occasion.
- Prep Time: 15 minutes
- Cook Time: 12 minutes
- Total Time: 27 minutes
- Yield: 8 servings
- Category: Dessert
- Method: Baked
- Cuisine: Mediterranean
Ingredients
- 200g kataifi pastry
- 150g dark chocolate (70% cocoa), chopped
- 100g milk chocolate, chopped
- 50g unsalted butter
- 2 tbsp honey
- 1/4 cup chopped pistachios (optional)
- 1/4 tsp sea salt flakes
Instructions
- Preheat your oven to 180°C (350°F). Line a baking tray with parchment paper.
- Place the kataifi pastry in a large bowl and gently shred it into smaller pieces.
- Melt the butter and honey together in a small saucepan over low heat.
- Pour the melted butter and honey mixture over the kataifi and toss gently to coat evenly.
- Spread the coated kataifi evenly on the prepared baking tray and bake for 10–12 minutes until golden and crispy. Remove from oven and let cool slightly.
- While the kataifi cools, melt the dark and milk chocolates separately using a double boiler or microwave in short bursts, stirring frequently.
- Layer half of the baked kataifi on parchment paper, drizzle with half of the dark chocolate, then sprinkle with some pistachios and sea salt.
- Repeat with the remaining kataifi and milk chocolate, topping again with pistachios and a pinch of sea salt.
- Allow the bark to set at room temperature or chill in the refrigerator for 20 minutes until firm.
- Break into irregular pieces and serve.
Notes
For an extra indulgent touch, drizzle the bark with white chocolate or add dried fruit such as cranberries before the chocolate sets.