I still remember the very first time I made these Cheesy Corn Ribs — it was one of those lazy summer afternoons when the kids were running around outside and I wanted something easy yet crowd-pleasing for dinner. I grabbed some fresh corn on the cob and started slicing it the way I’d seen online: into rib-like wedges that looked fun and perfect for snacking. Adding that shower of melted cheddar cheese and crunchy, crispy cheese corn bits that sizzle on the grill was honestly a game-changer for me and quickly turned into a family favorite. Cheesy Corn Ribs became my go-to when I needed something vibrant and comforting yet fuss-free, a corn on the cob recipe with a twist that transforms simple corn into a savory treat.
What’s funny is, I had my struggles getting the Cheesy Corn Ribs just right. At first, the corn rib seasoning wasn’t quite hitting that balance — either too bland or drowned out by cheese. But after some trial and error (and a few slightly burnt batches!), I nailed the seasoning blend that sings alongside the cheddar cheese corn goodness. It fits perfectly into our busy family life because it doesn’t take hours to prepare, and the kids love the crispy cheese corn edges that have that golden crunch from grilling. Plus, it’s a dish I can prep ahead a little and finish while catching up on some kitchen time, which is a lifesaver when you’re juggling dinner and homework.
If you haven’t tried grilled corn ribs before, you’re in for a treat. I’m sharing my recipe for Cheesy Corn Ribs here in hopes you’ll fall in love with it like we did. There’s something about a corn on the cob recipe that feels both nostalgic and fresh, and when paired with crispy cheese corn, it somehow makes summer dinners feel extra special. I also linked to a fantastic corn rib seasoning with garlic butter I came across that adds a flavor punch worth trying. I can’t wait for you to feel all that cheesy, crispy goodness melting in your mouth — so let’s dive in!
Ingredients:
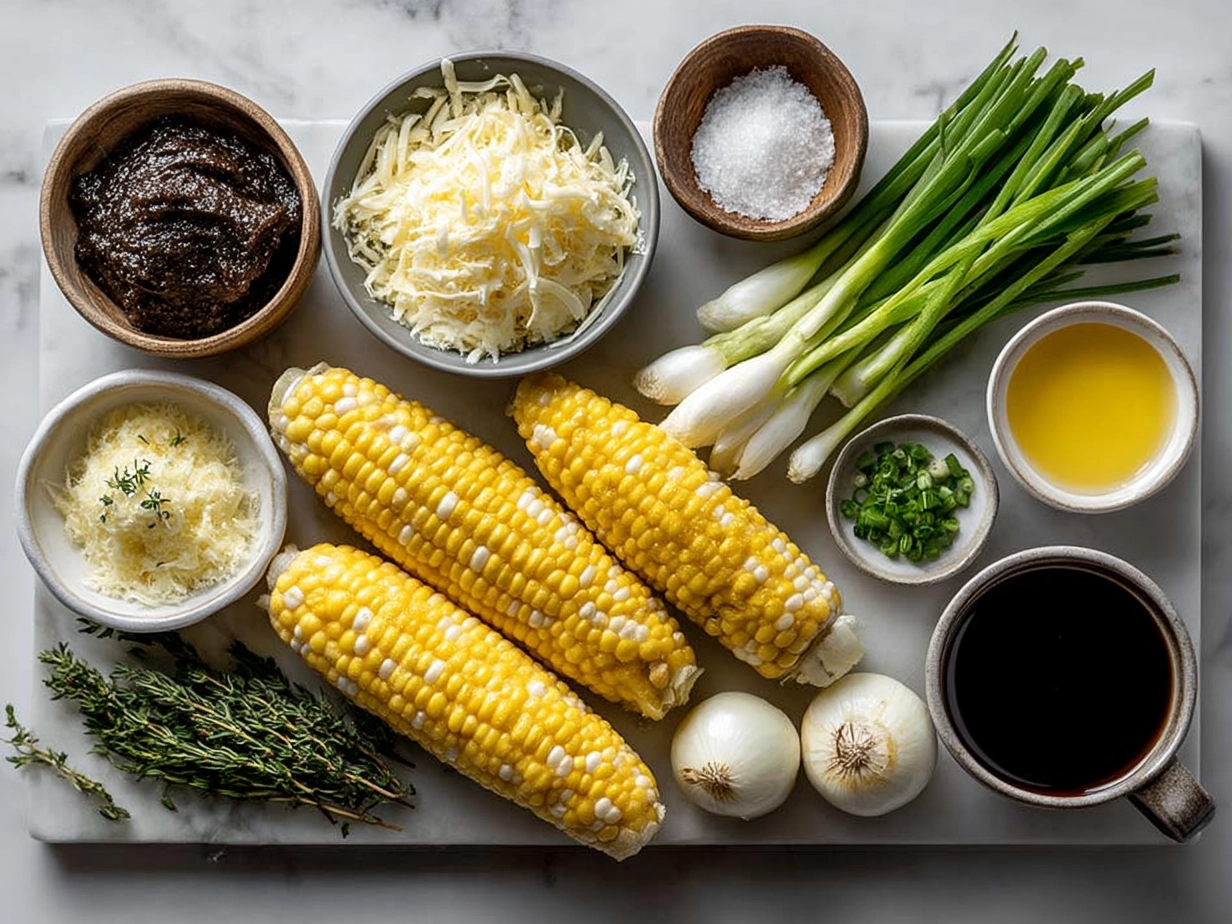
For these irresistible Cheesy Corn Ribs, here’s what you’ll want to have on hand. I always prefer fresh, sweet corn for my Cheesy Corn Ribs because it makes all the difference. If you grab your corn at the farmer’s market or the grocery store, look for bright green husks and plump kernels. Here’s my go-to ingredient list:
- 4 large ears of fresh corn on the cob, husked and sliced into ribs
- 1 cup shredded sharp cheddar cheese, for that classic cheddar cheese corn flavor
- 2 tablespoons unsalted butter, softened (I sometimes swap in garlic butter for extra punch)
- 1 teaspoon smoked paprika (a key player in my corn rib seasoning)
- 1/2 teaspoon chili powder (gives just a subtle kick; optional if kids are eating)
- 1/2 teaspoon garlic powder
- Salt and freshly ground black pepper, to taste
- Fresh chopped parsley or cilantro, for garnish if you like a fresh bite
When making Cheesy Corn Ribs, I always keep my eyes peeled during shopping — sometimes pre-shredded cheese can save time without sacrificing flavor. And if you want to switch up the cheese, a mix of mozzarella and cheddar can create that wonderfully melty, crispy cheese corn effect.
A kitchen hack I picked up from my mom for moisturizing corn before grilling is to brush the corn ribs with a little butter mixed with the corn rib seasoning—this helps the cheese layer stick beautifully without drying out the corn. Leftover cheese? Wrap it tight in plastic wrap and store in the fridge for up to a week — perfect for another dash of cheddar cheese corn magic later in the week.
If you’re looking for a shortcut, freezing corn ahead of time after blanching can be a life-saver on busy nights — just grill them from frozen, and you’re still good to go. For a money-saving tip, buying your cheese in bulk at warehouse stores can get you more mileage per meal, especially when the whole family is hooked on this crispy cheese corn goodness.
I also wanted to share a helpful link I found about corn cob smoked ribs that inspired my take on grilled corn ribs seasoning — it’s worth a look if you love exploring different ways to flavor your Cheesy Corn Ribs.
How to Make – Step-by-Step:
1. Prepare your corn on the cob by cutting each ear into “ribs.” This means slicing the corn vertically into 4 or 5 strips — think of each strip as a little rib packed with kernels ready to hold all that cheesy goodness. Don’t worry if your Cheesy Corn Ribs aren’t perfectly uniform; that rustic look adds charm.
2. Mix the corn rib seasoning. In a small bowl, blend softened butter, smoked paprika, chili powder, garlic powder, salt, and pepper. This fragrant butter mixture is your secret weapon for flavoring the ribs before they meet the heat.
3. Brush the corn ribs generously with the seasoned butter. This coating not only adds richness but helps lock in moisture so the grilled corn ribs stay juicy underneath the cheesy topping.
4. Preheat your grill or grill pan to medium-high heat. In my kitchen, Cheesy Corn Ribs usually take about 15 minutes total from seasoning to serving, so this is a great time to get everything lined up.
5. Grill the corn ribs, stirring gently halfway through, until you see lovely char marks and that natural corn sweetness caramelizing—usually about 7-10 minutes. The aroma at this point is pure heaven! (If you don’t have a grill, a hot cast-iron pan or broiler works well too.)
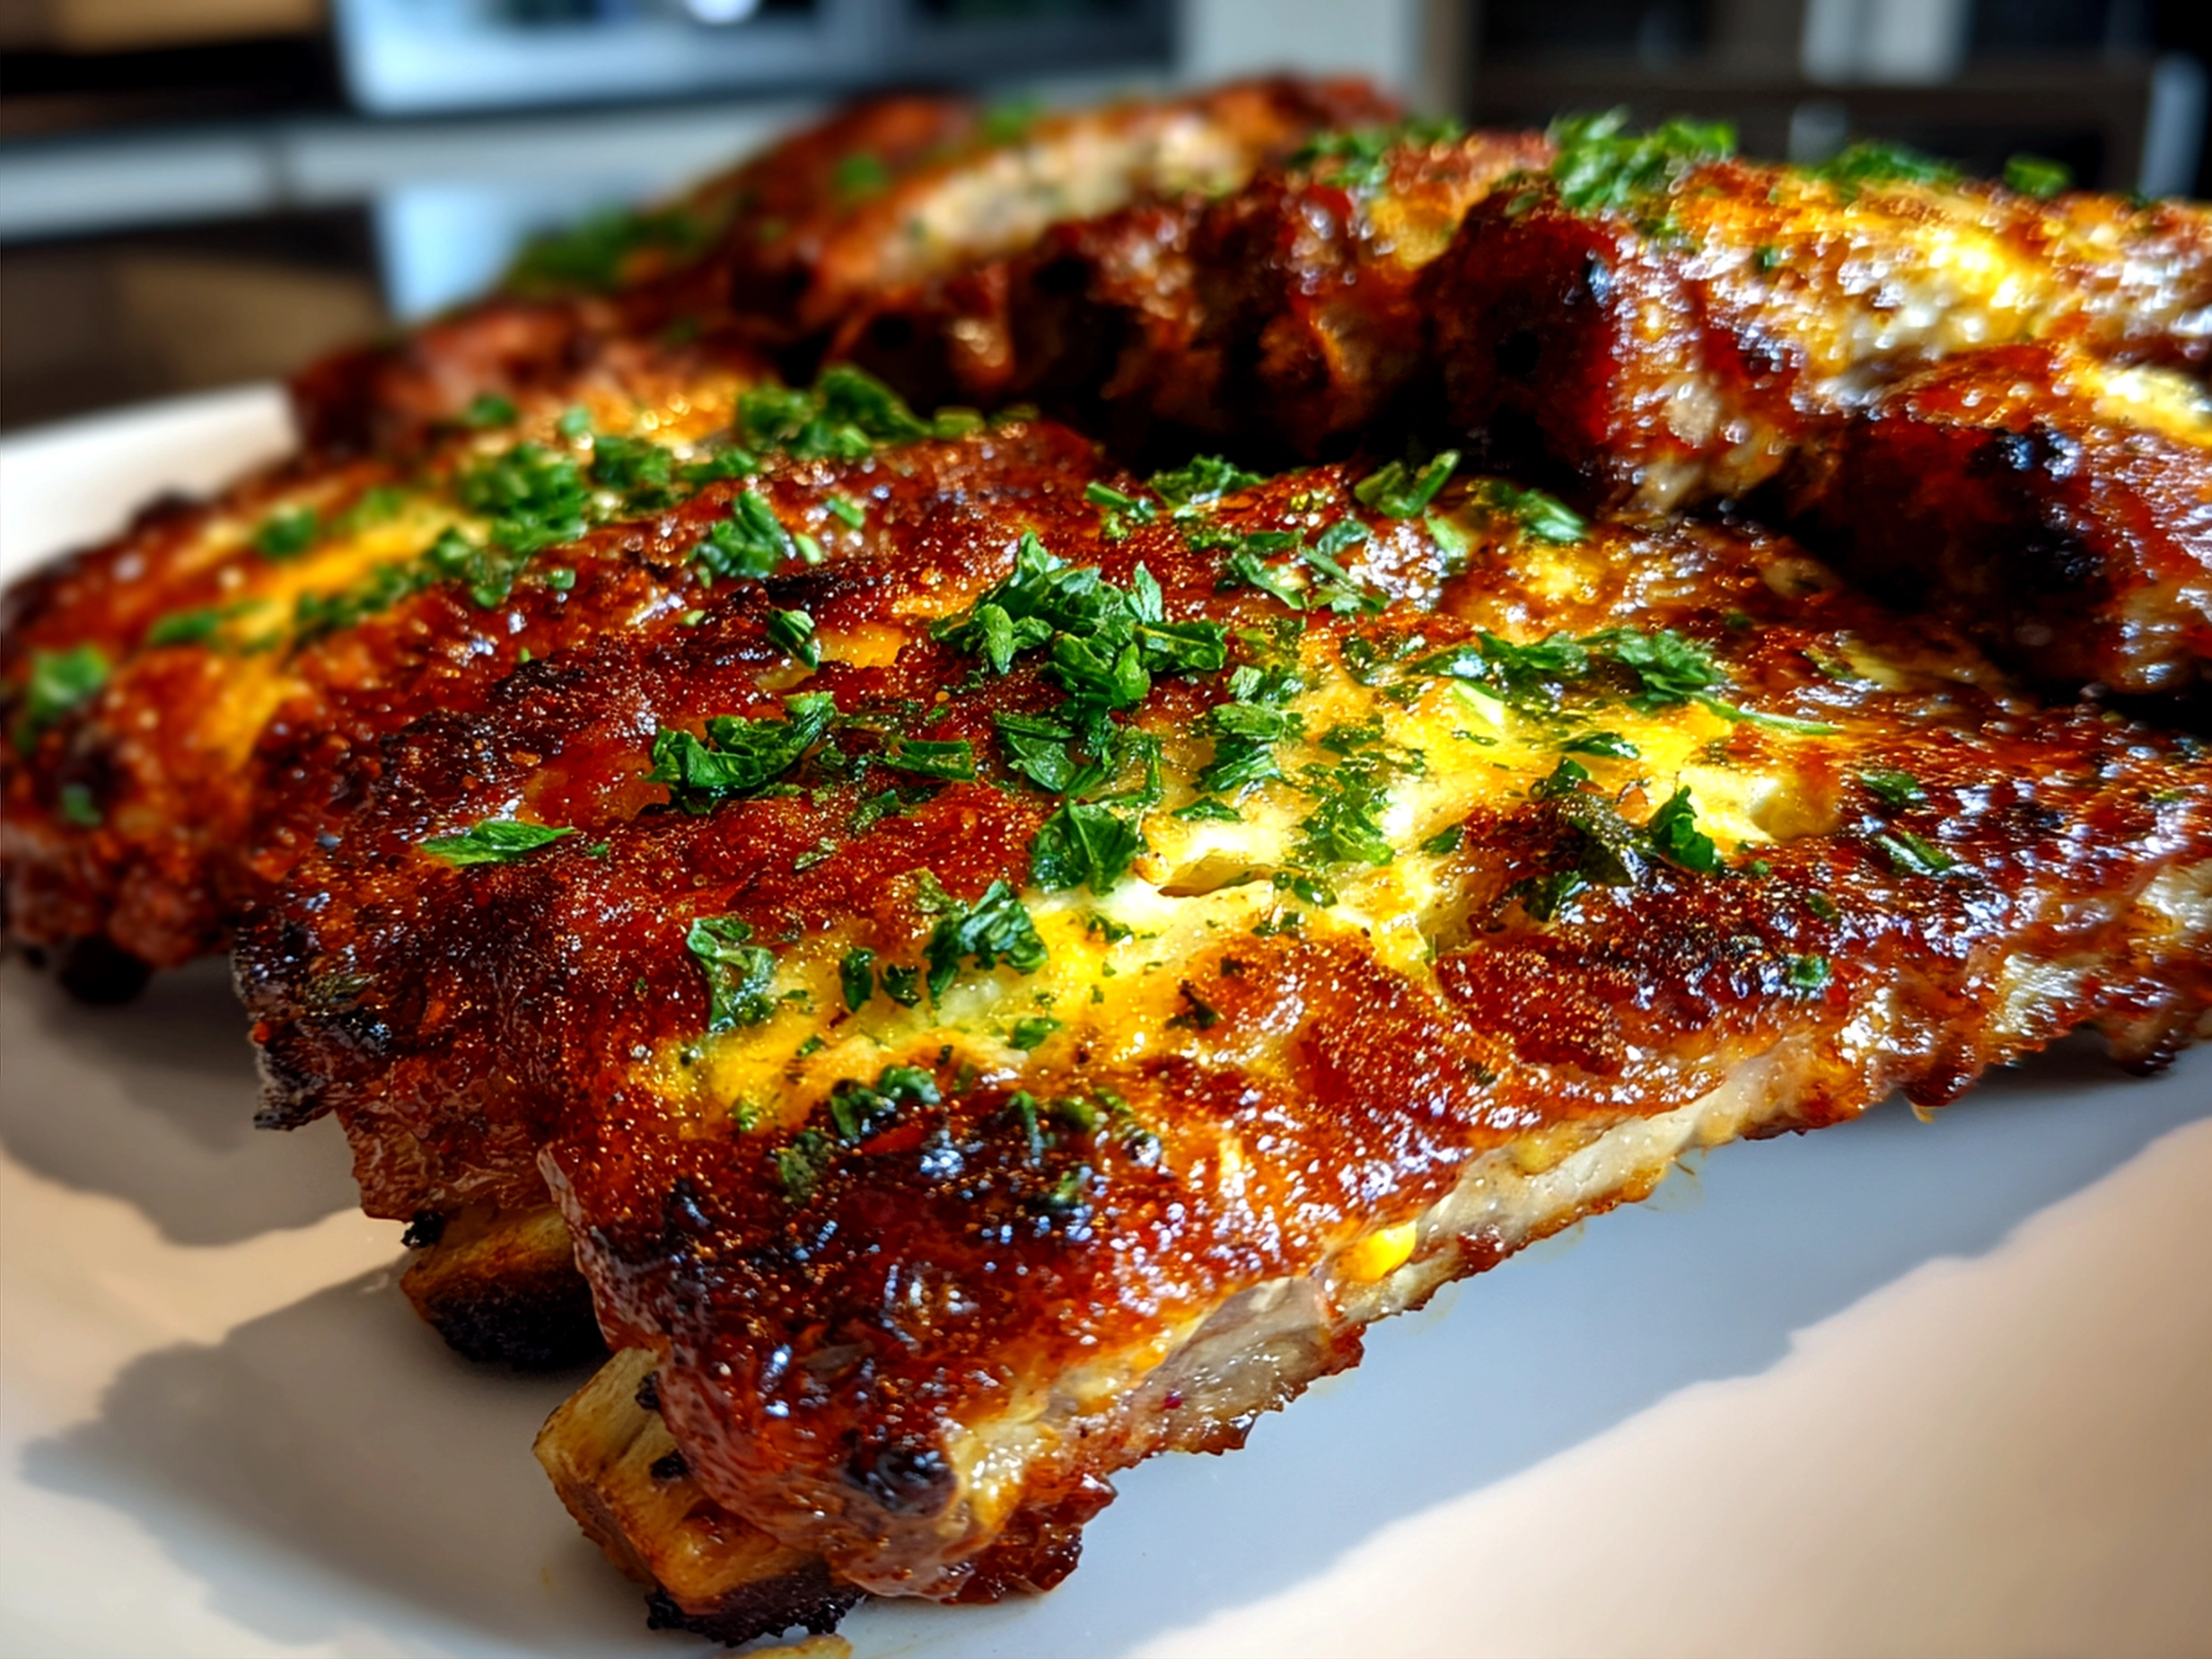
6. Sprinkle the shredded cheddar cheese over your grilled corn ribs — this is where things get cozy and melty. Cover with foil for a few minutes to let the cheese melt down into that crispy cheese corn perfection.
7. Optional: Place the cheesy corn on the cob recipe under your broiler for a minute or two if you want a crispy, golden top. Just watch closely so you don’t burn it!
8. Remove from heat and garnish with fresh herbs. Your Cheesy Corn Ribs should smell like toasted corn with a buttery, cheesy tang that’s impossible to resist.
Don’t worry if your first attempt is a bit messy; we’ve all been there with Cheesy Corn Ribs! A good tip I learned: prepping all ingredients ahead reduces stress during grilling. And while the Cheesy Corn Ribs are cooking, I usually start on a quick side or check a recipe like my favorite Grilled Corn Salad to round out the meal.
Want some more ideas on seasoning and garlic butter combos? Check out this fun Facebook group post on corn rib seasoning for inspired tweaks!
Serving:
 The best part about Cheesy Corn Ribs? How everybody dives in! The kids love holding those cheesy little corn rib “handles” with buttery fingers, especially when there’s that extra crispy cheese corn crust. I usually serve these alongside something fresh and light — like a bright tomato salad or chilled cucumber to balance out the rich cheddar cheese corn flavor.
For special occasions or backyard barbecues, this Cheesy Corn Ribs recipe is a guaranteed hit. It’s perfect for summer cookouts since it’s easy to make in batches and appeals to all ages. I even bring these cheesy corn on the cob recipe ribs along to potlucks or family gatherings. Everyone always asks for more, and it’s fun watching them come back for seconds while marveling at that golden crust!
One of my favorite presentation tips is to place the Cheesy Corn Ribs on a wooden board and garnish with chopped cilantro or parsley, maybe a little squeeze of lime for a fresh twist. This pops visually and invites everyone to dig in.
If you find yourself with leftover Cheesy Corn Ribs, don’t toss them! Chop up the ribs and toss them into a salad or use them as a flavorful topping for baked potatoes or even mac and cheese. Sometimes, I reheat them gently in the oven to bring back a bit of that crispy cheese corn layer—totally delicious.
I’ve tried seasonal twists too, like adding a sprinkle of jalapeño flakes in fall or a dash of smoked paprika in winter to warm them up. My friends are always amazed when I share these variations, and many rave that this Cheesy Corn Ribs recipe is their new “must-have” at family dinners.
Oh, and if you want ideas for side dishes, don’t miss the Southern Cornbread Poppers recipe that pairs beautifully with this!
FAQs:
Q: Can I make Cheesy Corn Ribs without a grill?
Absolutely! You can use a grill pan, broiler, or even a hot skillet on your stove. I’ve made grilled corn ribs indoors plenty of times when the weather wasn’t cooperating. Just keep an eye so the cheese doesn’t burn.
Q: What’s the best cheese for Cheesy Corn Ribs?
I love sharp cheddar for that classic cheddar cheese corn flavor, but sometimes I mix in mozzarella for extra meltiness. A smoked gouda or pepper jack can be tasty twists too.
Q: How do I avoid soggy Cheesy Corn Ribs?
Pat the corn ribs dry after cutting. Also, brushing with seasoned butter before grilling helps create a barrier so the cheese melts crispy rather than gooey. And don’t forget to let the cheese melt under foil to avoid burning while keeping it melty.
Q: Any tips for seasoning the Cheesy Corn Ribs just right?
Start with a mix of smoked paprika, garlic powder, and a touch of chili powder — my family loves this balance. I got inspired by this corn rib seasoning and garlic butter combo that really ups the flavor profile, especially when you grill to get that char.
Q: Can I prepare Cheesy Corn Ribs ahead of time?
Yes! You can cut and season the corn ribs a few hours before cooking, then grill and add cheese last minute. It’s handy when juggling dinner with kids’ activities.
Q: How do I store leftover Cheesy Corn Ribs?
Store them in an airtight container in the fridge for up to 2 days. I recommend reheating in the oven to revive that crispy cheese corn texture.
Q: Are Cheesy Corn Ribs kid-friendly?
Definitely! My kids devour these because they’re fun to eat, and the cheesy, slightly crispy edges are irresistible. If you want to keep it milder, just skip the chili powder in the corn rib seasoning.
For further ideas about smoked corn and ribs techniques, Kent Rollins’ blog on Corn Cob Smoked Ribs – Kent Rollins offers excellent tips I’ve tried with great success.
My Final Thoughts:
This Cheesy Corn Ribs recipe really holds a special place in my heart and kitchen. It started as a simple corn on the cob recipe experiment but turned into a universally loved dish that brings joy to our family table. My Cheesy Corn Ribs Pro Tips:
- Use fresh corn and slice evenly for best grilling — uneven slices can cook unevenly.
- Don’t rush the cheese melting; tent with foil and let it sit to get that perfect melty, crispy cheese corn crust.
- Experiment with the corn rib seasoning but keep the balance, smoky and savory with just a hint of spice.
I’ve tried various versions of Cheesy Corn Ribs with my family: swapping in pepper jack cheese for a spicy cheddar cheese corn option, using garlic butter in the corn rib seasoning for a deeper flavor, and even a vegan version with dairy-free cheese and olive oil butter. Everyone has their favorite, but honestly, the classic cheddar cheese corn wins every time.
If you make this Cheesy Corn Ribs your own, I hope it brings the same warm, comforting vibes to your family as it has to ours. Whether for a quick weeknight meal or a backyard gathering, these grilled corn ribs feel special without the fuss. You might even want to pair them with stuffed poblano peppers—here’s a link to my Cheesy Chicken and Corn Stuffed Poblano Peppers recipe that would go perfectly along with your Cheesy Corn Ribs feast.
Thank you for letting me share this little kitchen joy with you today. Can’t wait to hear about your first bite of that crispy cheese corn magic!
For more inspiration about cheese and corn combinations, check out these great ideas including Wisconsin cheese curds and corn ribs at Who’s On First in Ankeny that showcase Wisconsin cheese paired with corn ribs for an ultimate cheesy treat.
Cheesy Corn Ribs
Cheesy Corn Ribs are a fun and flavorful twist on corn on the cob, featuring tender corn slices coated in a delicious cheesy seasoning perfect as a snack or side dish.
- Prep Time: 10 minutes
- Cook Time: 15 minutes
- Total Time: 25 minutes
- Yield: 4 servings
- Category: Snack
- Method: Baked
- Cuisine: American
Ingredients
- 4 ears of corn, husked and sliced into ribs
- 1 cup shredded cheddar cheese
- 2 tablespoons melted butter
- 1 teaspoon smoked paprika
- 1/2 teaspoon garlic powder
- Salt and pepper to taste
- Fresh chopped parsley for garnish (optional)
Instructions
- Preheat your oven to 400°F (200°C) and line a baking sheet with parchment paper.
- Cut each ear of corn lengthwise into 4 ribs and place them on the baking sheet.
- Brush each corn rib with melted butter evenly.
- Sprinkle smoked paprika, garlic powder, salt, and pepper over the corn ribs.
- Generously sprinkle shredded cheddar cheese on top of each corn rib.
- Bake in the preheated oven for 12-15 minutes until the cheese is melted and golden brown.
- Remove from oven and garnish with fresh chopped parsley if desired.
- Serve warm as a tasty snack or side dish.
Notes
For an extra kick, sprinkle some chili powder or drizzle with hot sauce before serving.