Okay, settle in, friend! Let me tell you about my obsession with Caramelized Onions. I mean, seriously, is there anything better? The sweet, savory, melt-in-your-mouth goodness…just thinking about it makes my stomach rumble. My journey with Caramelized Onions wasn’t always smooth sailing, though. I remember one Thanksgiving where I completely burned a huge batch, and the whole house smelled like, well, burnt onions for days! Check out this Reddit thread about caramelizing onions. Talk about a kitchen disaster! But I persevered, tweaked the recipe, and now? Now, my Caramelized Onions are legendary, at least in my family.
These aren’t just any onions, honey. We’re talking deeply flavorful, intensely sweet Caramelized Onions that transform everything they touch. From simple grilled cheese to fancy French onion soup, they bring a depth of flavor that’s just incredible. I sneak them into everything – quiches, pizzas, even scrambled eggs! It’s the secret ingredient that makes everyone ask, “What is that flavor?”
I’m a busy mom, just like you, and I don’t have all day to spend in the kitchen. That’s why this Caramelized Onions recipe is streamlined and foolproof. I figured out the tricks to get that perfect caramelization without babysitting the stove for hours. It took a few tries, let me tell you! There were some watery, some acrid, and some downright sad attempts. But I learned along the way, and now I’m sharing all my hard-earned wisdom with you. For more tips, check out Lauren From Scratch’s guide on making caramelized onions.
I remember when I first truly nailed this recipe, my husband came home and declared it the “best thing ever.” The kids even ate it without complaining, which is a minor miracle! It’s one of those dishes that just makes everyone happy, and that’s what cooking is all about, right? It’s also a great way to use up all those Sweet onions you get from the farmers market in the fall. I’ve even started making a big batch to freeze so I always have some on hand.
So, grab your apron, your favorite pan (I’m partial to my cast iron for this – check out this Reddit discussion on caramelizing onions in cast iron), and let’s get cooking! You’re going to love how easy and rewarding this recipe is. Get ready to impress yourself, and everyone you feed!
Ingredients for Perfect Caramelized Onions
- 3 large Sweet onions, thinly sliced (about 6 cups)
- 2 tablespoons olive oil
- 2 tablespoons butter
- 1/2 teaspoon salt
- 1/4 teaspoon black pepper
- 2 tablespoons balsamic vinegar (optional, but HIGHLY recommended)
- 1 tablespoon brown sugar (optional, for extra sweetness)
- 1/4 cup beef broth or water (if needed to deglaze the pan)
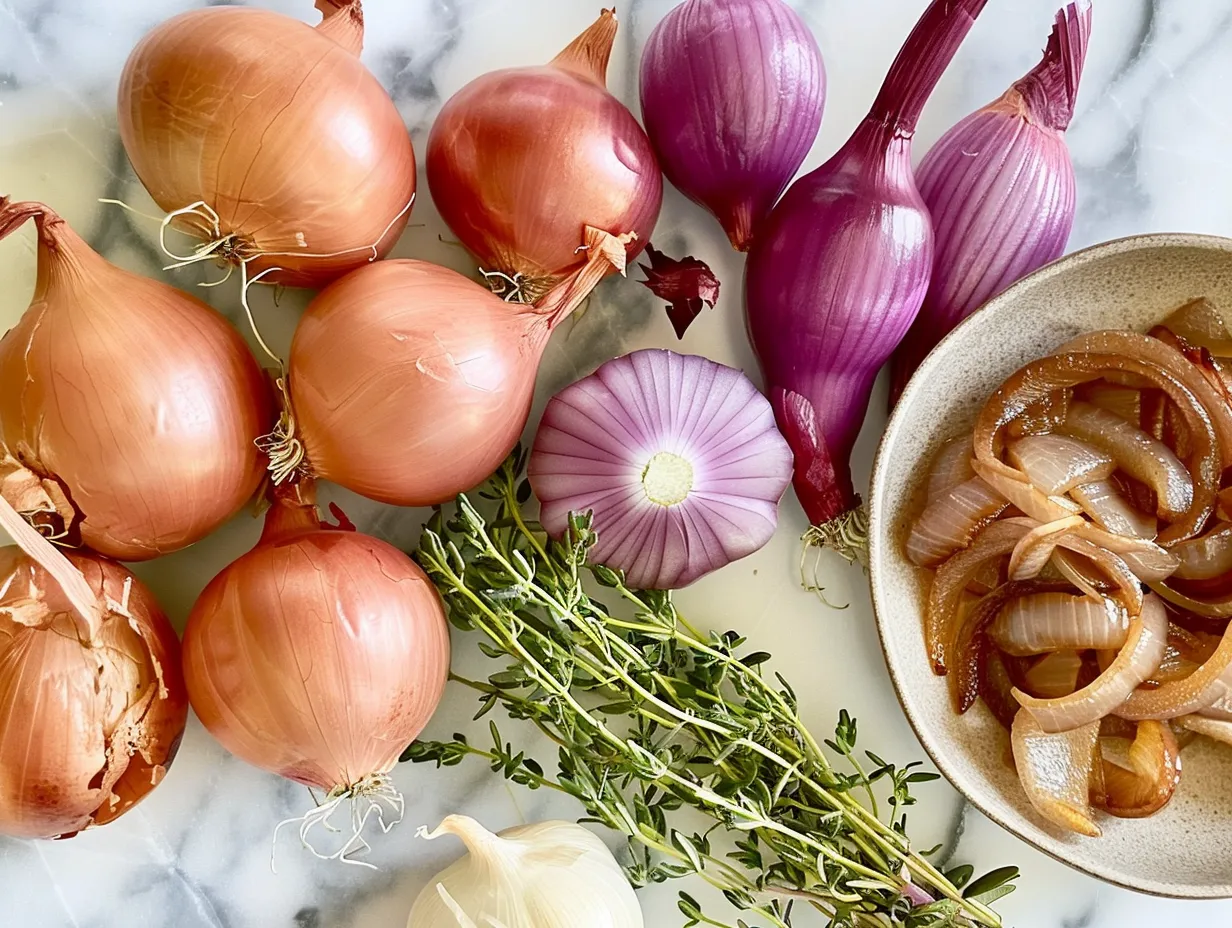
Okay, let’s talk ingredients. First, the onions. I always use Sweet onions like Vidalia or Walla Walla when making Caramelized Onions because they have a naturally higher sugar content, which helps them caramelize beautifully. You can find these at pretty much any grocery store, especially during the summer and fall months. However, yellow onions are a good substitute for Caramelized Onions if you want a less-sweet outcome.
Here’s a Caramelized Onions trick I learned from my mom: soak the sliced onions in ice water for about 15 minutes before cooking. This helps to mellow out their sharpness and makes them even sweeter when caramelized. I also always use a mix of olive oil and butter for Caramelized Onions. The olive oil helps to prevent the butter from burning, and the butter adds richness and flavor.
Now, about the balsamic vinegar. This is my secret weapon! A splash of balsamic vinegar adds a touch of tanginess that balances the sweetness of the onions perfectly. I use a good quality balsamic, but you don’t have to break the bank. You can usually find a decent bottle at your local supermarket. And if you’re feeling extra decadent, a tablespoon of brown sugar will give the Caramelized Onions an even deeper, richer flavor.
For Caramelized Onions, I love using good quality butter, and sometimes if I am feeling really frisky I’ll splurge on the fancy European butter. But honestly, for everyday cooking, the regular stuff works just fine. And don’t forget the salt and pepper! These are essential for bringing out the flavors of the onions. A pinch of red pepper flakes can also add a lovely hint of spice.
As for cost-saving tips, buying onions in bulk is usually cheaper, especially if you’re making a big batch of Caramelized Onions. You can also freeze leftover onions to use later. Just chop them up and store them in a freezer bag or container.
If you have leftover Caramelized Onions, store them in an airtight container in the refrigerator for up to 5 days. Or, you can freeze them for up to 3 months. This is a great way to have Caramelized Onions on hand for all sorts of dishes. I always make a big batch of Balsamic caramelized onions and freeze it to use on sandwiches.
How to Make Caramelized Onions: A Step-by-Step Guide
Step 1: Prep the Onions
Slice the Sweet onions thinly. Remember my mom’s trick? Soaking them in ice water for 15 minutes helps mellow them out. Drain them well before proceeding. Using a mandoline can help you get evenly thin slices, which ensures even cooking.
Step 2: Sauté the Onions
In a large, heavy-bottomed skillet (cast iron is my favorite!), heat the olive oil and butter over medium heat. Add the sliced onions, salt, and pepper. Stir to coat the onions with the oil and butter. Make sure the skillet is large enough; overcrowding will steam the onions instead of caramelizing them.
Step 3: Caramelize Slowly
This is the key! Reduce the heat to low, cover the skillet, and cook for 30 minutes, stirring occasionally. The onions will start to soften and release their moisture. Don’t worry if your Caramelized Onions seem watery at first. That’s perfectly normal! The moisture needs to evaporate for proper caramelization. Adding a pinch of baking soda can also speed up the process, but be careful not to add too much.
Step 4: Uncover and Continue Cooking
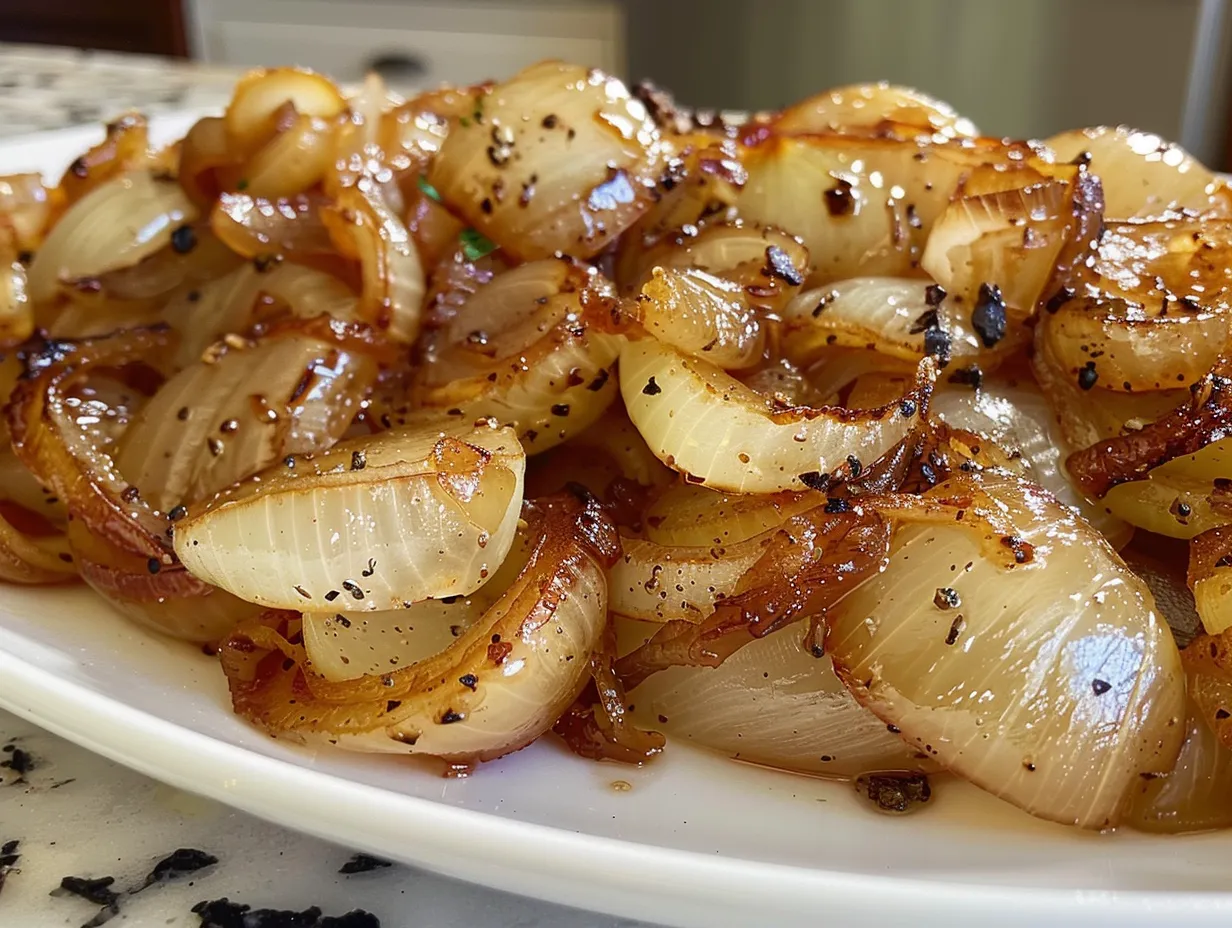
Remove the lid and continue cooking for another 30-45 minutes, stirring frequently. The onions should start to turn a golden brown color and become very soft and sweet. This is where the magic happens! I learned the hard way with Caramelized Onions that patience is key. Resist the urge to crank up the heat; low and slow is the name of the game.
Step 5: Deglaze the Pan (if needed)
If the onions start to stick to the bottom of the pan, add a tablespoon or two of beef broth or water to deglaze the pan. Scrape up any browned bits from the bottom of the pan and stir them into the onions. This adds even more flavor. In my kitchen, Caramelizing onions slowly usually takes about an hour, but it can take longer depending on your stove and the type of onions you use. Wine can also be used to deglaze for a richer flavor.
Step 6: Add the Balsamic Vinegar and Brown Sugar (optional)
Stir in the balsamic vinegar and brown sugar (if using) and cook for another 5-10 minutes, until the onions are a deep, rich brown color and the vinegar has reduced slightly. Your Caramelized Onions should smell sweet and savory. The balsamic vinegar not only adds flavor but also helps to further break down the onions.
Step 7: Taste and Adjust Seasoning
Taste the Caramelized Onions and adjust the seasoning as needed. You may want to add a little more salt, pepper, or balsamic vinegar to taste. Don’t be afraid to get creative here! A pinch of smoked paprika or a dash of Worcestershire sauce can add unique depths of flavor.
While the Caramelized Onions is cooking, I usually catch up on emails, read a book, or just relax with a cup of coffee. It’s a great time to unwind and enjoy the delicious aroma filling your kitchen. I find that the key is stirring them pretty often. At first it doesn’t seem like much is happening, but keep going, keep stirring and your work will be rewarded.
I always make sure I have all my ingredients prepped before I start cooking. This saves time and makes the whole process much smoother. And don’t be afraid to experiment with different flavors! You can add herbs like thyme or rosemary, or spices like smoked paprika or cumin, to give your Caramelized Onions a unique twist. You can even caramelize other vegetables along with the onions, like garlic or shallots.
And remember, don’t rush the process! The key to perfect Caramelized Onions is to cook them low and slow, allowing the sugars to caramelize and the flavors to develop. It takes time, but it’s so worth it!
Serving Suggestions for Caramelized Onions
Oh, the possibilities! My family enjoys this Caramelized Onions when I add them to grilled cheese sandwiches. It’s a simple but delicious way to take a classic comfort food to the next level. The kids love them on burgers, and my husband can eat them straight out of the pan (I have to hide them sometimes!). They’re also fantastic in omelets and breakfast burritos.
Caramelized Onions are the perfect addition to any cheese board. They pair wonderfully with creamy cheeses like brie or goat cheese, as well as sharp cheeses like cheddar or Gruyere. The sweetness of the onions complements the richness of the cheese beautifully.
This Caramelized Onions is perfect for special occasions like Thanksgiving or Christmas, but I also make them for everyday meals. They’re great in omelets, frittatas, and quiches. I also love to add them to pizzas and flatbreads.
For presentation, I like to top my dishes with a sprinkle of fresh herbs, like parsley or thyme. This adds a pop of color and flavor. You can also drizzle a little balsamic glaze over the top for an extra touch of sweetness and tanginess. A sprinkle of sea salt can also elevate the flavors.
If you have extra Caramelized Onions, you can use them to make Onion jam. Simply blend the Caramelized Onions with a little balsamic vinegar and sugar, and cook until thickened. This is a delicious condiment for sandwiches, burgers, and grilled meats. You can also add a bit of pectin for a more traditional jam consistency.
In the fall, I love to add Caramelized Onions to my butternut squash soup. The sweetness of the onions complements the sweetness of the squash perfectly. And in the summer, I use them in my Caprese salad. The Caramelized Onions add a savory element that balances the sweetness of the tomatoes and the creaminess of the mozzarella.
My friends always ask for this Caramelized Onions recipe, and they’re always amazed at how easy it is to make. I think the key is to use good quality ingredients and to be patient. You can also add caramelized grilled peaches for another great caramelized snack. The reward is a dish that is both incredibly flavorful and incredibly versatile.
Frequently Asked Questions About Caramelized Onions
- Why are my Caramelized Onions bitter? Ah, the age-old question! Bitterness usually means the onions were cooked at too high a heat or for too short a time. You need to cook them low and slow, allowing the sugars to fully caramelize. If they’re starting to burn, reduce the heat even further and add a splash of water or broth. You know what I do when my Caramelized Onions are bitter? I add a teaspoon of honey. It will add a little sweetness that can counteract the bitterness. A pinch of baking soda can also help neutralize bitterness.
- How do I prevent my Caramelized Onions from sticking to the pan? Make sure you’re using a heavy-bottomed skillet. Cast iron is ideal. Also, don’t be afraid to add a little extra olive oil or butter. And be sure to stir the onions frequently, especially as they start to caramelize. Sometimes I’ll add a tablespoon of water. That usually helps. Using a non-stick skillet can also be a good option.
- Can I use a different type of onion? Yes, you can! While Sweet onions like Vidalia or Walla Walla are my favorite for Caramelized Onions, yellow onions will also work. They’ll have a slightly less sweet flavor. Red onions can be used for a more intense flavor. Shallots can also be caramelized for a more delicate flavor.
- How long do Caramelized Onions last? Caramelized Onions will last for up to 5 days in the refrigerator, stored in an airtight container. You can also freeze them for up to 3 months. I often freeze them in small portions so I can easily grab them when I need them. Freezing in ice cube trays is a great way to portion them out.
- Can I make Caramelized Onions in a slow cooker? Yes, you can! Add the onions, olive oil, butter, salt, and pepper to your slow cooker and cook on low for 8-10 hours, stirring occasionally. This is a great option if you want to make a big batch without having to babysit the stove. This is also really great if you are trying to make Balsamic caramelized onions.
- What can I add to my Caramelized Onions to make them even more flavorful? The possibilities are endless! I love adding herbs like thyme or rosemary, spices like smoked paprika or cumin, or a splash of balsamic vinegar or Worcestershire sauce. My family likes it when I add a clove or two of garlic to the mix. Just be sure to mince it finely so it doesn’t burn. A bay leaf can also add a subtle, aromatic flavor.
- My Caramelized Onions are too watery. What did I do wrong? This usually means you didn’t cook the onions long enough. Continue cooking them over low heat, stirring frequently, until the excess moisture has evaporated and the onions are a deep, rich brown color. I’ve also found that adding a little cornstarch can help thicken them up. Make sure the pan isn’t overcrowded, as this can also cause excess moisture.
Final Thoughts on My Caramelized Onion Recipe
This Caramelized Onions recipe holds a special place in my heart because it’s a dish that I perfected through trial and error, and it’s something my whole family enjoys. It’s more than just a recipe; it’s a memory of Thanksgiving mishaps and kitchen triumphs. And of course, this recipe makes amazing French onion soup.
Here are my Caramelized Onions Pro Tips:
- Low and slow is the way to go: Don’t rush the process.
- Use a heavy-bottomed skillet: Cast iron is your best friend.
- Don’t be afraid to experiment: Try different flavors and add-ins.
I’ve tried so many variations of Caramelized Onions over the years. My husband loves the classic version, while my daughter prefers them with a little brown sugar for extra sweetness. My son is a big fan of the balsamic caramelized onions, which I often use as a topping for his burgers. Check out my other recipe on caramelized pear pie!
I encourage you to make this Caramelized Onions your own! Don’t be afraid to experiment with different flavors and techniques until you find what works best for you. I hope you have as much fun making this recipe as I do, and that it brings as much joy to your family as it has to mine. Remember, cooking is all about love and sharing, so get in the kitchen and create something delicious! The key is to just get started.
So, go ahead, give it a try! You might just discover your own obsession with Caramelized Onions.
Caramelized Onions
Sweet and savory, caramelized onions are a versatile ingredient that adds depth and richness to countless dishes. This simple recipe yields perfectly golden and tender onions, ideal for topping burgers, pizzas, or enhancing soups and dips.
- Prep Time: 10 minutes
- Cook Time: 40 minutes
- Total Time: 50 minutes
- Yield: 4 servings
- Category: Side Dish
- Method: Skillet
- Cuisine: American
Ingredients
- 2 large yellow onions, thinly sliced
- 2 tablespoons olive oil
- 1 tablespoon butter
- 1/2 teaspoon salt
- 1/4 teaspoon black pepper
- 1 tablespoon balsamic vinegar (optional)
Instructions
- Heat olive oil and butter in a large skillet over medium-low heat.
- Add sliced onions, salt, and pepper to the skillet.
- Cook, stirring occasionally, for 30-45 minutes, or until the onions are deeply golden brown and very soft. Reduce heat if necessary to prevent burning.
- If using, stir in balsamic vinegar during the last 5 minutes of cooking. This adds a tangy sweetness to the onions.
- Remove from heat and let cool slightly before using.
Notes
Caramelized onions can be stored in an airtight container in the refrigerator for up to 5 days. They are delicious on grilled cheese sandwiches, in omelets, or as a topping for crostini.