Oh, honey, let me tell you about my Homemade ciabatta bread. It’s more than just a recipe; it’s a story, a memory, a warm hug on a plate. I still remember the first time I tried to make it. Picture this: flour everywhere, a sticky dough that seemed determined to stay glued to my hands, and a kitchen that looked like a small blizzard had just passed through.
It was a disaster! I almost gave up, convinced that Homemade ciabatta bread was best left to the professionals. But then my grandma, bless her soul, reminded me that even the best bakers started somewhere. She taught me a little trick – a long, slow rise in the fridge – that completely transformed my Homemade ciabatta bread.
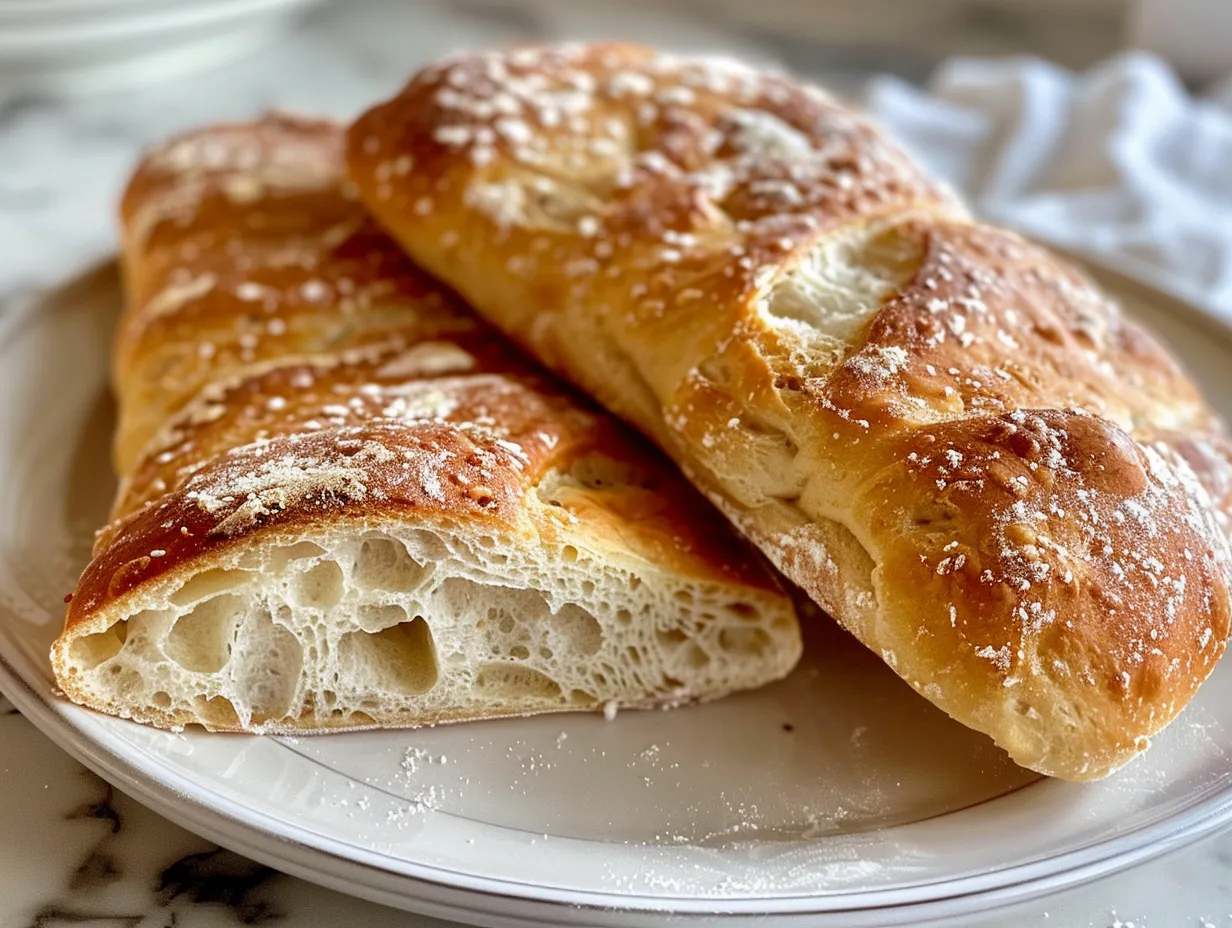
That first successful loaf? The crust was perfectly crisp, the inside airy and full of those signature holes, and the taste? Oh, the taste! It was heavenly. Since then, my Homemade ciabatta bread has become a staple in our house. It’s perfect for sandwiches, dipping in olive oil, or just tearing off a piece and enjoying it warm from the oven. I make it at least twice a month, sometimes more if we have company coming. Even with my super busy schedule, I find time for it because it truly brings so much joy.
There was a point, though, where my attempts at Homemade ciabatta bread kept failing. The dough would be too dense, or the crust too hard. I was starting to lose hope, but I was determined to figure out what I was doing wrong. Turns out, the water temperature was key! Too hot and it kills the yeast, too cold and it doesn’t activate properly. It was a total “aha!” moment. Now, I’m so confident in my Homemade ciabatta bread, I almost feel like I could do it with my eyes closed!
This Homemade ciabatta bread fits perfectly into my busy family life because I can prepare the dough the night before and let it do its thing in the fridge. Then, in the morning, it’s just a matter of shaping, proofing, and baking. It’s become a weekend ritual for us, and the smell of it baking fills the house with such warmth and happiness. So, come on, let’s get baking! Trust me, you can do this, and I’m here to guide you every step of the way. Let’s get ready to create some magic in your kitchen with this ciabatta bread recipe!
Ingredients for Homemade Ciabatta Bread
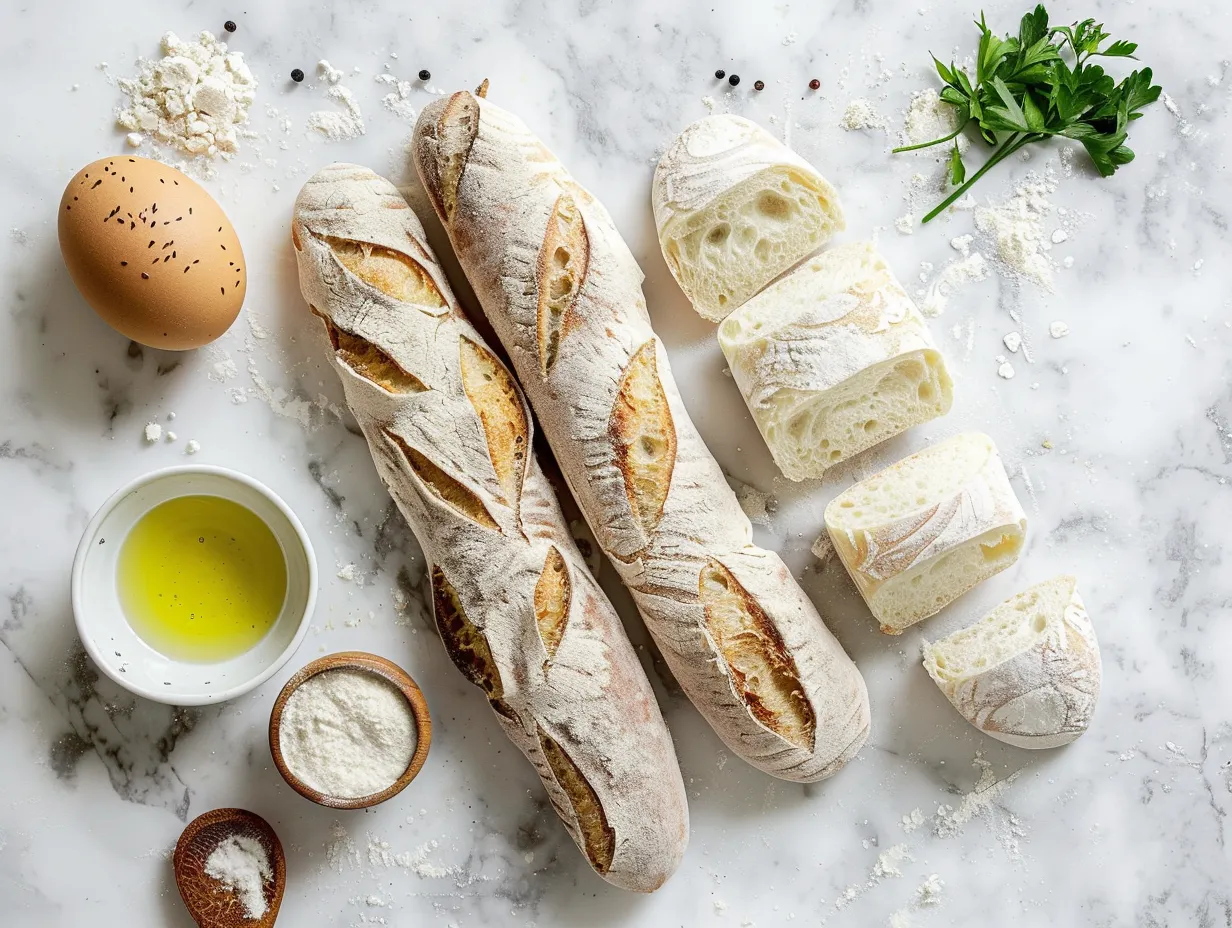
- 4 cups (500g) bread flour, plus more for dusting
- 1 teaspoon (3g) active dry yeast
- 2 teaspoons (12g) salt
- 1 ¾ cups (420ml) lukewarm water (about 105-115°F)
- 2 tablespoons olive oil, plus more for greasing
I always use bread flour for my Homemade ciabatta bread because it gives it that wonderful chewy texture. Bread flour has a higher protein content, which results in more gluten development. This creates the structure needed for the signature air pockets in ciabatta. All-purpose flour will work in a pinch, but the results won’t be quite the same. You might find the bread is slightly less chewy and doesn’t have the same open crumb.
I also prefer active dry yeast because it’s what I always have on hand, but you can use instant yeast too – just skip the proofing step. Active dry yeast needs to be proofed to ensure it’s alive and active before adding it to the dough, while instant yeast can be added directly to the dry ingredients.
Tips for Ingredient Selection
When making Homemade ciabatta bread, you can find good quality bread flour at most grocery stores or online. Don’t be afraid to splurge a little on good olive oil, it really does make a difference in the flavor. A good quality extra virgin olive oil will add a fruity and peppery note to the bread.
Here’s a trick I learned from my mom: warm the water slightly before adding the yeast. It helps to activate the yeast faster. The ideal temperature range is between 105-115°F (40-46°C). If the water is too hot, it can kill the yeast, and if it’s too cold, it won’t activate properly.
Shortcuts and Cost-Saving Tips
For a shortcut, especially when I’m short on time and trying to make Homemade ciabatta bread, I sometimes use my stand mixer to knead the dough. It saves me a lot of elbow grease! However, ciabatta dough is quite wet and sticky, so be careful not to overmix it in the stand mixer, as this can develop too much gluten and result in a tougher bread. Mix it on low speed for just a few minutes until the dough comes together.
A cost-saving tip is to buy flour in bulk if you bake often. It’s much cheaper in the long run. Store it in an airtight container to keep it fresh.
Storing Ingredients
As for storing leftover ingredients for your next batch of Homemade ciabatta bread, I keep my flour in an airtight container in a cool, dark place. This helps to prevent it from going rancid or absorbing moisture. The yeast goes in the fridge to prolong its shelf life. Now, onto the fun part – making the dough!
How to Make Homemade Ciabatta Bread – Step-by-Step
- In a large bowl, whisk together the bread flour, yeast, and salt. It’s super important to make sure everything is evenly distributed so your easy ciabatta recipe gets a good start. This ensures that the yeast is evenly dispersed throughout the flour, which will result in a more consistent rise.
- Add the lukewarm water and olive oil to the dry ingredients. Stir with a wooden spoon or your hands until a shaggy dough forms. Don’t worry if it looks a little rough; it’ll come together as it rests. The dough will be quite wet and sticky at this stage, which is normal for ciabatta dough.
- Cover the bowl with plastic wrap and let it rest for 30 minutes. This is called the autolyse, and it helps develop the gluten in the dough, leading to a better texture in your Homemade ciabatta bread. The autolyse allows the flour to fully hydrate, which improves the elasticity and extensibility of the dough.
- After 30 minutes, perform a series of stretch and folds. To do this, wet your hands, reach under one side of the dough, stretch it upwards, and fold it over onto itself. Rotate the bowl and repeat this process 6-8 times. Rest for 30 minutes. I learned the hard way with Homemade ciabatta bread that wet hands are key to preventing the dough from sticking everywhere! The stretch and folds help to develop the gluten and strengthen the dough without kneading.
- Repeat the stretch and fold process two more times, with 30-minute rests in between. Each time you do this, the dough will become smoother and more elastic. You’ll notice that the dough becomes easier to handle with each set of stretch and folds.
- After the final stretch and fold, cover the bowl with plastic wrap and refrigerate for at least 12 hours, or up to 24 hours. This long, slow fermentation is what gives Italian ciabatta bread its signature flavor and texture. The cold fermentation allows the yeast to slowly develop the dough’s flavor complexity.
- The next day, gently turn the dough out onto a heavily floured surface. Be careful not to deflate it too much. I learned that if you use too much force, you’ll lose those precious air bubbles. The air bubbles are what give ciabatta its open crumb structure.
- Gently shape the dough into a rectangle, about 12×8 inches. Use a bench scraper or a large knife to cut the dough into 4 equal pieces. Don’t worry if your ciabatta dough recipe makes loaves that aren’t perfectly shaped – that’s part of the charm! Ciabatta is meant to be rustic and irregular in shape.
- Carefully transfer the loaves to a baking sheet lined with parchment paper. Sprinkle the tops with flour. The parchment paper will prevent the loaves from sticking to the baking sheet.
- Cover the baking sheet with plastic wrap and let the loaves proof for 1-1.5 hours, or until they have almost doubled in size. I usually proof my baking ciabatta bread in a warm spot in my kitchen, like near the oven. Proofing allows the dough to rise and become light and airy before baking.
- Preheat your oven to 450°F (232°C) with a baking stone or baking sheet inside. If you don’t have a baking stone, a regular baking sheet works just fine. Place an empty baking pan on the bottom rack of the oven. The baking stone or baking sheet helps to create a crispy crust.
- Right before baking, carefully pour about 1 cup of hot water into the empty baking pan. This will create steam in the oven, which helps the Homemade ciabatta bread develop a crispy crust. The steam prevents the crust from setting too quickly, allowing the bread to expand fully.
- Gently transfer the parchment paper with the loaves onto the preheated baking stone or baking sheet.
- Bake for 20-25 minutes, or until the loaves are golden brown and sound hollow when tapped on the bottom. In my kitchen, Homemade ciabatta bread usually takes about 22 minutes. While the Homemade ciabatta bread is cooking, I usually tidy up the kitchen and start thinking about what I’m going to serve it with. The internal temperature of the bread should be around 200-210°F (93-99°C).
- Remove the loaves from the oven and let them cool completely on a wire rack before slicing and serving. Your Homemade ciabatta bread should smell like a bakery, with a slightly tangy aroma. Cooling the bread completely allows the crumb to set and prevents it from becoming gummy.
Serving Suggestions for Your Ciabatta Bread
The kids love our Homemade ciabatta bread when I use it to make mini pizzas. They each get to choose their own toppings, and it’s a fun and easy meal. My husband loves it grilled with a little bit of garlic butter – simple but delicious!
My go-to side dishes that pair with Homemade ciabatta bread are a simple green salad with a vinaigrette and a hearty bowl of minestrone soup. The crusty bread is perfect for soaking up all the delicious broth. I also love serving it with a cheese and charcuterie board – it’s always a hit with guests. Try pairing with some Homemade ciabatta bread with this Southern cornbread poppers recipe
This Homemade ciabatta bread is perfect for so many occasions! I make it for weekend lunches, potlucks with friends, and especially for holidays like Thanksgiving and Christmas. It’s a great addition to any bread basket, offering a delightful contrast in texture and flavor to other breads.
Presentation Tips
For presentation, I like to slice the Homemade ciabatta bread diagonally and arrange it on a platter with a drizzle of olive oil and a sprinkle of sea salt. It looks so elegant and inviting. A balsamic glaze can also add a touch of sweetness and visual appeal.
Storing Leftover Ciabatta
If you have extra Homemade ciabatta bread, don’t let it go to waste! You can make croutons, bread pudding, or even panzanella salad. It also freezes really well – just wrap it tightly in plastic wrap and then in foil. Properly wrapped, it can last in the freezer for up to 2-3 months.
Seasonal Variations
For a seasonal variation, try adding some chopped rosemary and sun-dried tomatoes to the dough in the fall. It adds a lovely flavor and aroma that’s perfect for the cooler months. In the spring, you could add some fresh herbs like basil or chives for a brighter, more vibrant flavor.
My friends always ask for this Homemade ciabatta bread recipe, and I’m always happy to share it. It’s such a rewarding recipe to make, and it’s always a crowd-pleaser. If you’re looking to serve your next gathering with some fresh bread, consider trying it with this Southern peach bread recipe.
Frequently Asked Questions About Ciabatta
- Why is my ciabatta bread so dense?
Ah, the dreaded dense ciabatta! You know what I do when my Homemade ciabatta bread turns out dense? I usually suspect that the yeast wasn’t active enough, or that the dough didn’t proof for long enough. Make sure your water is the right temperature (105-115°F) and give the dough plenty of time to rise. It also could be due to over mixing the dough, resulting in a dense loaf. Another factor could be the quality of the flour. Using old or low-quality flour can also result in a dense bread.
- How do I get those big holes in my ciabatta bread?
Those big holes are the hallmark of a good Italian ciabatta bread! The key is to handle the dough very gently after it has risen. Don’t punch it down or deflate it too much. Also, a high hydration dough (meaning a lot of water) is essential for achieving that open crumb. Consider researching this Easy No Knead Ciabatta Bread Recipe – An Italian in my Kitchen.
- Can I make ciabatta bread without a baking stone?
Absolutely! I often make my Homemade ciabatta bread without a baking stone. Just use a regular baking sheet. It might not get quite as crispy on the bottom, but it will still be delicious. To improve the crust without a baking stone, you can preheat the baking sheet in the oven before placing the bread on it.
- How long does ciabatta bread last?
Homemade ciabatta bread is best eaten fresh, but it will last for 2-3 days at room temperature if stored in an airtight bag. You can also freeze it for longer storage. Consider also trying this easy homemade peach bread.
- Can I use instant yeast instead of active dry yeast?
Yes, you can! Just skip the proofing step and add the instant yeast directly to the flour. The rest of the ciabatta bread recipe remains the same.
- Why is my ciabatta bread so flat?
If your Homemade ciabatta bread is flat, it could be because the dough was over-proofed. This means it rose for too long and the gluten structure collapsed. Try reducing the proofing time next time. Also, be gentle when transferring the loaves to the baking sheet, as rough handling can deflate the dough.
- What can I do with leftover ciabatta bread?
Oh, there are so many possibilities! I love making croutons, bread pudding, or panzanella salad with leftover Homemade ciabatta bread. You can also use it to make French toast or grilled cheese sandwiches. Day-old ciabatta is also great for making bruschetta or crostini.
I made this Homemade ciabatta bread with a rosemary and sea salt variation and it was a big hit with my book club.
My Final Thoughts
This Homemade ciabatta bread recipe holds a special place in my heart because it reminds me of my grandma and her unwavering belief in me. It’s a recipe that I’ve tweaked and perfected over the years, and it’s one that I’m always proud to share with others. Baking the perfect loaf is similar to How To Make Homemade Ciabatta Bread | Alexandra’s Kitchen.
Here are my pro tips:
- Don’t be afraid to experiment: Try adding different herbs, cheeses, or even olives to the dough. The possibilities are endless!
- Use a good quality olive oil: It really does make a difference in the flavor of the bread.
- Be patient: The dough needs time to rise and develop its flavor. Don’t rush the process.
I’ve tried a few different variations of this Homemade ciabatta bread over the years. My husband loves the garlic and herb version, while the kids are partial to the cheese and jalapeno one. I personally love the sun-dried tomato and basil version.
Here are a few more Homemade ciabatta bread variations I love:
- Rosemary and Sea Salt: A classic combination that enhances the naturally delicious flavor of the ciabatta.
- Olive and Herb: Kalamata olives and a mix of Italian herbs create a savory and aromatic bread.
- Garlic and Parmesan: A crowd-pleasing option with a rich, cheesy, and garlicky flavor.
I really hope you give this Homemade ciabatta bread recipe a try. It’s easier than you might think, and the results are so worth it. Don’t be discouraged if your first loaf isn’t perfect – just keep practicing and you’ll get there. Remember, baking is all about experimenting and having fun! Also, checkout this Easy Ciabatta Bread Recipe: So Light, Airy & Chewy! -Baking a ….
So, go ahead, grab your apron, and let’s get baking! I have no doubt that you’ll be enjoying your own Homemade ciabatta bread in no time. The journey of making your own Homemade ciabatta bread is so rewarding, and I can’t wait for you to experience that magic, too!
Homemade ciabatta bread
Bake your own authentic, crusty ciabatta bread at home with this easy recipe. This Italian classic is perfect for sandwiches, dipping in olive oil, or enjoying on its own.
- Prep Time: 20 minutes
- Cook Time: 30 minutes
- Total Time: 2 hours
- Yield: 2 loaves
- Category: Bread
- Method: Baked
- Cuisine: Italian
Ingredients
- 4 cups (500g) bread flour, plus more for dusting
- 1 3/4 cups (420ml) lukewarm water
- 1 teaspoon (4g) active dry yeast
- 2 teaspoons (12g) salt
- 2 tablespoons olive oil, plus more for greasing
Instructions
- In a large bowl, dissolve yeast in lukewarm water. Let stand for 5 minutes until foamy.
- Add flour, salt, and olive oil to the yeast mixture. Stir until a shaggy dough forms.
- Turn dough out onto a lightly floured surface and knead for 8-10 minutes until smooth and elastic.
- Place dough in a lightly oiled bowl, turning to coat. Cover with plastic wrap and let rise in a warm place for 1-1.5 hours, or until doubled in size.
- Gently deflate the dough and turn it out onto a lightly floured surface. Divide the dough in half.
- Shape each half into a rectangular loaf, about 10-12 inches long.
- Place the loaves on a baking sheet lined with parchment paper. Dust generously with flour.
- Cover with plastic wrap and let rise for another 30-45 minutes.
- Preheat oven to 450°F (232°C).
- Bake for 25-30 minutes, or until golden brown and the internal temperature reaches 200-210°F (93-99°C).
- Let cool completely on a wire rack before slicing and serving.
Notes
Serve warm with olive oil and balsamic vinegar for dipping, or use for making delicious sandwiches.