Oh, sweet friend, pull up a chair! I was just thinking about the first time I really nailed this incredible Cherry Cheese Pastry Pie, and it instantly brought a smile to my face. It’s funny how some recipes just become woven into the fabric of your family, isn’t it? This particular cream cheese dessert has certainly done that for us. For years, I struggled with making a truly show-stopping, yet simple, dessert that felt special enough for guests but wasn’t too fussy for a regular Tuesday. My initial attempts at anything involving puff pastry were, well, let’s just say experimental.
I had visions of a beautiful, flaky crust, but often ended up with something closer to a sad, deflated pillow. There were a few burnt edges, some undercooked middles, and more than one time the filling decided to stage a dramatic escape. But I persevered, mainly because I adore anything with cherries and cream cheese, and I knew there had to be an easy cherry pie recipe out there that worked for my busy life.
Then, one day, while frantically trying to whip something up for a last-minute potluck, I stumbled upon a variation of this Cherry Cheese Pastry Pie. I had some forgotten puff pastry in the freezer and a can of cherry pie filling in the pantry, and decided to just go for it, using what I had. It was truly an “aha!” moment. The simplicity of using pre-made puff pastry with a luscious cream cheese filling and vibrant cherries made the process so much less intimidating.
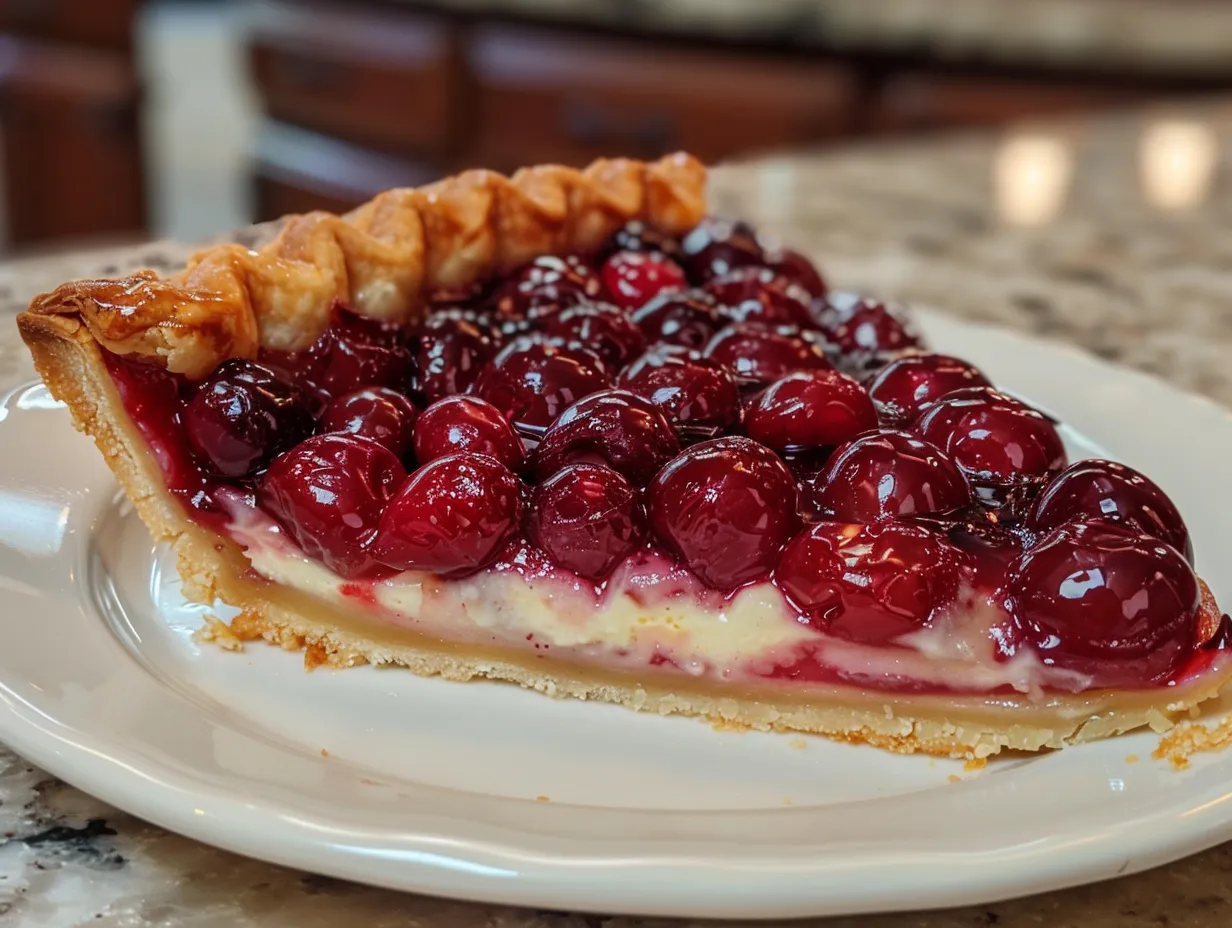
When I pulled that golden, bubbling Cherry Cheese Pastry Pie out of the oven, smelling of warm cherries and vanilla, I knew I had found a keeper. The golden-brown pastry, the creamy, tangy cheese filling, and the sweet, slightly tart cherries bursting through – it was just magic.
This particular Cherry Cheese Pastry Pie recipe has become my secret weapon for everything from impromptu brunches to holiday gatherings. It’s elegant enough to impress, but genuinely so simple to put together, leaving me plenty of time to actually enjoy my family instead of being stuck in the kitchen. It’s the kind of dessert that looks like you spent hours, but really, it’s our little secret.
I promise you, once you try this Cherry Cheese Pastry Pie, you’ll wonder how you ever lived without it. It’s truly one of those fruit and cream cheese pastries that will bring joy to your table and make your kitchen smell absolutely heavenly. So, are you ready to make some kitchen magic together? Let’s get started!
INGREDIENTS
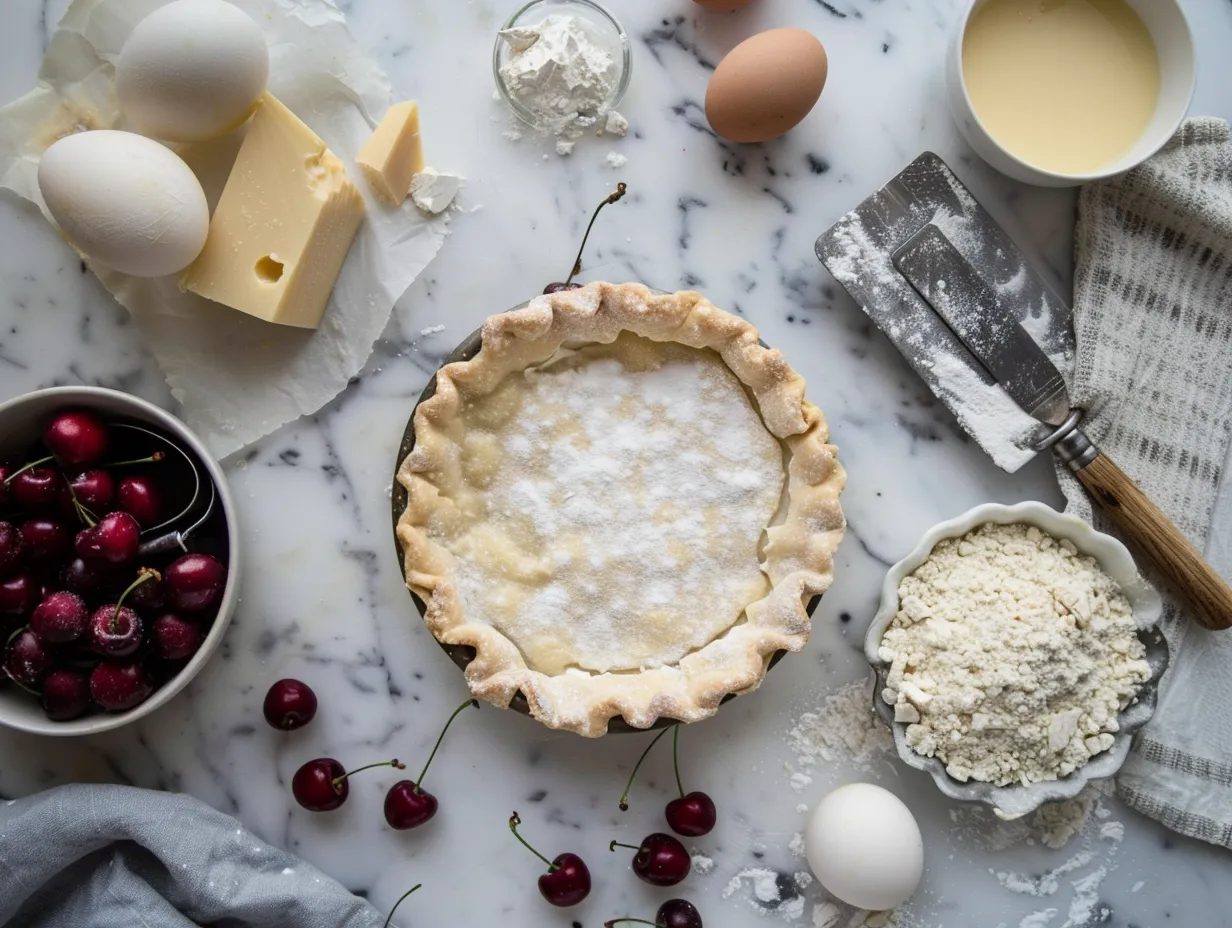
Alright, let’s gather our treasures for this Cherry Cheese Pastry Pie! This list might look simple, and that’s precisely the beauty of it. We’re working with ingredients that are easy to find and come together wonderfully for a delightful sweet cheese tart.
Here’s what you’ll need for your Cherry Cheese Pastry Pie:
- 1 (17.3-ounce) package frozen puff pastry, thawed (2 sheets)
- 8 ounces cream cheese, softened
- 1/2 cup granulated sugar, plus 2 tablespoons for sprinkling
- 1 large egg yolk
- 1 teaspoon vanilla extract
- 1 (21-ounce) can cherry pie filling (or homemade, if you’re feeling ambitious!)
- 1 tablespoon milk or cream (for egg wash)
When I’m making this Cherry Cheese Pastry Pie, I always use a good quality full-fat cream cheese for that rich, creamy texture in the filling. It truly makes all the difference in the final product. For the puff pastry, I usually grab whatever brand is on sale, but I make sure it’s a well-known one.
You can find puff pastry in the freezer aisle of just about any grocery store, usually right next to the frozen pie crusts. Just remember to pull it out to thaw in the fridge overnight, or for about 30-40 minutes at room temperature, before you plan to bake your Cherry Cheese Pastry Pie. Trying to unfold it when it’s still frozen is a recipe for tears, both yours and the pastry’s!
Here’s a Cherry Cheese Pastry Pie trick I learned from my mom: make sure your cream cheese is really softened. Like, leave it out on the counter for at least an hour, or even longer if your kitchen is cool. This helps prevent lumps in your cream cheese mixture, giving you a perfectly smooth and dreamy filling for your puff pastry cherry pie.
For cost-saving tips, keep an eye out for sales on cream cheese, especially around holidays. And generic brands of cherry pie filling are often just as good as the name brands for this easy cherry pie recipe. If you want to use fresh cherries, go for it! Just make sure to pit them and sweeten them to your liking before using. This step can be a bit of a project, but it’s so rewarding.
If you have leftover cream cheese from making your Cherry Cheese Pastry Pie, it keeps well wrapped in the fridge for about a week, perfect for spreading on bagels or making another delicious cream cheese dessert.
HOW TO MAKE – STEP-BY-STEP
Alright, my dear, this is where the magic happens! Making this Cherry Cheese Pastry Pie is surprisingly simple, and I’ll walk you through it just like we’re side-by-side in my kitchen. Don’t worry if your Cherry Cheese Pastry Pie isn’t perfectly symmetrical the first time around – mine rarely is! The beauty of homemade is that it’s unique.
- Prep Your Pastry: First things first, preheat your oven to 400°F (200°C). Then, gently unfold one sheet of your thawed puff pastry onto a parchment-lined baking sheet. Take your time with this! If the pastry feels a bit stiff, let it sit for another few minutes. I learned the hard way with Cherry Cheese Pastry Pie that forcing cold puff pastry to unfold often leads to tears and cracks, which means a less flaky crust. Once unfolded, very lightly roll it out just a touch, maybe to about a 10×12 inch rectangle. You want it just a little bit bigger to give you some room to work.
- Score and Chill: Using a sharp knife or a pastry wheel, lightly score a border about 1/2 to 3/4 inch in from the edge of the pastry. Do not cut all the way through! This is a crucial step for your puff pastry cherry pie, as it creates that beautiful raised edge that puffs up around the filling. Gently transfer the pastry on the parchment paper to a baking sheet. Repeat with the second sheet of pastry on a separate parchment-lined baking sheet. Place both baking sheets in the fridge for about 10-15 minutes. This little chill time helps the pastry hold its shape better when it hits the hot oven, leading to a more impressive Cherry Cheese Pastry Pie.
- Whip the Filling: While your pastry is chilling, let’s get that dreamy cream cheese filling ready for your Cherry Cheese Pastry Pie. In a medium bowl, combine the softened cream cheese, 1/2 cup of granulated sugar, the egg yolk, and vanilla extract. Beat with an electric mixer (or a whisk and some elbow grease!) until the mixture is completely smooth and creamy. Make sure there are no lumps of cream cheese. This is the heart of your sweet cheese tart, so make it velvety!
- Assemble the First Pastry Pie: Pull one chilled pastry sheet from the fridge. Spoon half of the cream cheese mixture onto the center of the pastry, spreading it evenly within the scored border. Leave that nice border clear – that’s your puff-up zone! Next, spoon half of the cherry pie filling over the cream cheese layer. Spread it gently, but don’t mix it too much with the cream cheese. The distinct layers are what make this Cherry Cheese Pastry Pie so visually appealing.
- Prepare for Baking: In a small bowl, whisk together the remaining egg yolk (you can save the white for an omelet later!) and 1 tablespoon of milk or cream. This is our egg wash, and it’s going to give your Cherry Cheese Pastry Pie that gorgeous golden sheen. Brush this mixture generously over the scored edges of the pastry. This helps them get beautifully browned and flaky.
- Bake It Up: Carefully transfer the baking sheet with your assembled Cherry Cheese Pastry Pie to the preheated oven. Bake for 18-22 minutes, or until the pastry is puffed and golden brown, and the filling is bubbly. Every oven is a little different, so keep an eye on it. In my kitchen, this easy cherry pie recipe usually takes about 20 minutes. While this first Cherry Cheese Pastry Pie is cooking, you can start assembling your second one on its own baking sheet to be ready to go into the oven once the first one comes out.
- The Grand Finale: Once the first Cherry Cheese Pastry Pie is golden and puffed, carefully remove it from the oven. Immediately sprinkle the hot pastry with about 1 tablespoon of granulated sugar. This gives it a lovely sparkle and a hint of extra sweetness. Let it cool on the baking sheet for a few minutes before transferring it to a wire rack to cool completely. Repeat the baking process with your second Cherry Cheese Pastry Pie. Your kitchen should smell like a delicious bakery right now – warm cherries, vanilla, and toasted pastry. It’s truly one of the best smells. I often find myself dancing around the kitchen while the Cherry Cheese Pastry Pie is baking, tidying up as I go.
And there you have it! A beautiful, simple, and absolutely delicious Cherry Cheese Pastry Pie ready to be devoured.
SERVING :
Once your Cherry Cheese Pastry Pie has cooled enough to handle (or even just warm, if you’re like my family and can’t wait!), it’s ready to shine! The kids love our Cherry Cheese Pastry Pie when I slice it into squares and let them have it for an after-school treat, sometimes with a little dollop of whipped cream on top. It’s also become a staple for weekend brunches. Just slice it and serve – it’s that simple and yet so impressive.
My go-to side dish for this sweet cheese tart is definitely a generous scoop of good quality vanilla bean ice cream. The cold, creamy ice cream perfectly complements the warm, slightly tart cherries and the rich cream cheese filling. Freshly whipped cream is another fantastic option, adding a light, airy touch. Sometimes, for a more elegant presentation, I’ll dust the finished Cherry Cheese Pastry Pie with a light cloud of powdered sugar right before serving. It just adds that little extra something, making it look like a professional bakery creation.
This Cherry Cheese Pastry Pie is perfect for so many occasions. I’ve brought it to potlucks, served it at holiday gatherings (it’s especially festive around Christmas with those bright red cherries!), and even made it for a simple weeknight dessert when we needed a little pick-me-up. It travels well too, which is a big bonus. Just slide it onto a flat plate or board and cover loosely.
If you have extra Cherry Cheese Pastry Pie (a rare occurrence in my house, I tell you!), it stores beautifully. Just cover it loosely with plastic wrap or foil and keep it at room temperature for a day, or in the fridge for up to three days. It’s actually quite delicious cold for breakfast, almost like a Danish! You can also gently warm it in a low oven for a few minutes to bring back that fresh-baked feel.
I’ve tried a few seasonal Cherry Cheese Pastry Pie variations too. In the summer, I’ve used fresh blueberries or peaches instead of cherries, and they’ve been equally delightful fruit and cream cheese pastries. For a fall twist, apple pie filling with a sprinkle of cinnamon makes a cozy version. My friends always ask for this Cherry Cheese Pastry Pie recipe whenever I bring it to a get-together, and it warms my heart every time! It’s such a reliable crowd-pleaser.
FAQs:
You know, over the years, I’ve had so many friends and readers ask me questions about this Cherry Cheese Pastry Pie. It’s wonderful to know so many of you are trying it out! Here are some of the most common questions I get, along with my honest, tried-and-true answers:
Q: Can I use different fruit fillings for this Cherry Cheese Pastry Pie?
A: Absolutely, yes! This is one of the things I love most about this easy cherry pie recipe. I’ve successfully made this with blueberry, apple, peach, and even mixed berry pie fillings. Just stick to the same quantity as the cherry filling. My oldest loves the apple version, especially with a little sprinkle of cinnamon on top! It truly is a versatile puff pastry cherry pie.
Q: My puff pastry didn’t puff up! What went wrong with my Cherry Cheese Pastry Pie?
A: Oh, I’ve been there! The most common culprits are either the pastry wasn’t cold enough when it went into the oven (it needs that chill to help it puff!), or your oven wasn’t quite hot enough. Make sure your oven is fully preheated to 400°F. Also, be gentle when handling the pastry; too much rolling or stretching can inhibit its puff. I also learned that if you cut too deeply into the scored border, it won’t create that nice, distinct frame. It’s a tricky balance sometimes, but even if it doesn’t puff perfectly, it’ll still taste amazing!
Q: Can I use fresh or frozen cherries instead of canned pie filling for my Cherry Cheese Pastry Pie?
A: Yes, you certainly can! If using fresh cherries, you’ll need to pit them first (a cherry pitter makes this much easier!). I’d recommend tossing them with about 1/4 to 1/2 cup of sugar and a tablespoon of cornstarch (to thicken the juices as they bake) before spreading them on the cream cheese layer. For frozen cherries, thaw them first, drain any excess liquid, and then treat them similarly to fresh, adding sugar and cornstarch. This homemade touch can really take your Cherry Cheese Pastry Pie to the next level. If you’re going the homemade fruit filling route, I often reference guides like this one on “How to Make Fruit Pie Filling” to get the consistency just right.
Q: How do I store leftover Cherry Cheese Pastry Pie?
A: For short-term storage (a day or so), you can leave it loosely covered at room temperature. But because of the cream cheese, I prefer to keep it in an airtight container in the refrigerator for up to 3 days. It’s still delicious cold, especially for breakfast. You can also gently warm individual slices in the microwave for 15-20 seconds, or in a toaster oven until warmed through.
Q: My cream cheese filling is lumpy. What happened?
A: This usually means your cream cheese wasn’t soft enough when you mixed it. It’s so important for the cream cheese to be at true room temperature. If it’s still a bit firm, it won’t blend smoothly and you’ll end up with little clumps. If this happens, don’t fret! The taste of your cream cheese dessert will still be wonderful, even if the texture isn’t perfectly uniform. Next time, give it more time on the counter, or try gently warming it in the microwave for 10-15 seconds at a time until soft (but not melted!).
Q: Can I freeze unbaked or baked Cherry Cheese Pastry Pie?
A: I wouldn’t recommend freezing the assembled unbaked pie, as the puff pastry might not perform as well after thawing. However, you can freeze leftover baked Cherry Cheese Pastry Pie slices. Wrap them tightly in plastic wrap and then foil, and store in an airtight container for up to a month. Thaw in the fridge overnight and then warm gently. My blog readers have given me feedback that freezing slices works well for quick treats!
Q: What if I don’t have parchment paper?
A: Parchment paper is really helpful here to prevent sticking and make cleanup easier. If you don’t have it, you can lightly grease your baking sheet, but be aware that the puff pastry might stick a bit more. It’s definitely worth investing in a roll of parchment paper if you bake frequently!
My Final Thoughts:
Oh, this Cherry Cheese Pastry Pie, it truly holds such a special place in my heart, and in our family’s dessert rotation. It’s more than just a recipe; it’s a source of so many happy memories, from impromptu birthday celebrations to quiet Sunday afternoons spent together. It’s comforting, sweet, and just feels like a big, warm hug. This is one of those sweet cheese tart recipes that gives you maximum impact for minimum effort, and that’s a win in my book for any busy home cook.
Here are a few My Cherry Cheese Pastry Pie Pro Tips to help you out:
- Don’t skip the chill time for the pastry. Seriously, that 10-15 minutes in the fridge before baking makes a world of difference for that beautiful puff.
- Be gentle with your puff pastry. It’s delicate! Handle it as little as possible and don’t overwork it.
- Don’t overfill the pastry. Keep the cream cheese and cherry layers within that scored border, or you’ll have a bubbly overflow mess (I’ve been there!).
You can really make this Cherry Cheese Pastry Pie your own. We’ve tried so many variations! A sprinkle of almond extract in the cream cheese filling is lovely, and for a truly rich fruit and cream cheese pastries experience, I’ve even added a thin layer of chocolate ganache over the cream cheese before the cherries. My husband loves the classic Cherry Cheese Pastry Pie, but the kids are huge fans of the mixed berry version.
We’ve also used homemade pie filling from fresh berries picked from a local farm, which adds an even more special touch. If you’re feeling adventurous and love other cheese-based desserts, sometimes I’ll whip up a quick cream cheese dip like this Baked Texas Trash Cheese Dip for an appetizer, or maybe a peppermint cheesecake mousse pie for a seasonal twist after the Cherry Cheese Pastry Pie.
My hope for you, my friend, is that this Cherry Cheese Pastry Pie brings as much joy and deliciousness to your kitchen as it has to mine. Don’t be afraid to experiment, to make it exactly how your family loves it. Cooking should be an adventure, a creative outlet, and a way to show love. So go ahead, whip up this amazing Cherry Cheese Pastry Pie, gather your loved ones around, and savor every flaky, creamy, cherry-filled bite. You’ve got this, and I just know it’s going to be absolutely wonderful! Enjoy every moment with your very own Cherry Cheese Pastry Pie!
Cherry Cheese Pastry Pie

Indulge in pure joy with this incredibly easy Cherry Cheese Pastry Pie, featuring a flaky puff pastry crust, creamy cheese filling, and sweet cherry topping. Perfect for a quick dessert or a delightful treat any time, this recipe brings smiles with minimal effort.
- Prep Time: 15 minutes
- Cook Time: 25 minutes
- Total Time: 40 minutes
- Yield: 8 servings
- Category: Dessert
- Method: Baked
- Cuisine: American
Ingredients
Scale
- 1 sheet (14.1 ounces) frozen puff pastry, thawed
- 8 ounces cream cheese, softened
- 1/4 cup granulated sugar
- 1 teaspoon vanilla extract
- 1 large egg yolk
- 1 (21 ounce) can cherry pie filling
- 1 large egg, whisked with 1 tablespoon water (for egg wash)
- Powdered sugar, for dusting (optional)
Instructions
- Preheat your oven to 400°F (200°C). Line a baking sheet with parchment paper.
- In a medium bowl, beat the softened cream cheese, granulated sugar, and vanilla extract with an electric mixer until smooth and creamy. Beat in the egg yolk until fully combined.
- Unroll the thawed puff pastry sheet onto a lightly floured surface. Cut it into 8 equal squares (or rectangles if preferred).
- Spoon about 1-2 tablespoons of the cream cheese mixture onto one half of each pastry square/rectangle, leaving a small border.
- Top the cream cheese with about 1-2 tablespoons of the cherry pie filling.
- Carefully fold the other half of the pastry over the filling, creating a turnover shape. Press down the edges firmly with your fingers, then crimp them with a fork to seal completely.
- Transfer the pastries to the prepared baking sheet. Brush the tops of each pastry with the egg wash. You can also make a few small slits on top of each pastry to allow steam to escape.
- Bake for 20-25 minutes, or until the pastry is puffed, golden brown, and cooked through.
- Remove from the oven and let cool slightly on a wire rack. Dust with powdered sugar before serving, if desired.
Notes
For an extra touch, serve the warm pastry pie with a scoop of vanilla ice cream or a dollop of whipped cream.