Oh my goodness, friend, come on in! Pull up a chair at the kitchen island, maybe grab a cup of coffee. I was just thinking about my all-time favorite, most requested, family-friendly recipe that pretty much guarantees everyone will clear their plates: my homemade popcorn chicken. You know, the kind that makes your kitchen smell absolutely divine and has the kids practically doing happy dances? It’s true, it’s a showstopper.
I remember the very first time I nailed this homemade popcorn chicken recipe. It was a chaotic Tuesday evening, dinner plans had fallen apart, and I had these chicken breasts that needed using. The kids were squabbling, and honestly, I was about five seconds away from ordering pizza, which, let’s be honest, is always a fallback! But then I thought, “What if I could make those crispy chicken bites that the kids love so much, right here at home?” I’d tried a few times before, and they’d ended up either soggy or too tough, but something clicked that night.
The aroma of the seasoned flour hitting the hot oil was just heavenly – it was that comforting, inviting smell of true home cooking. That night, after countless attempts at finding just the right balance of spices and that perfect crispy coating, I finally got it. The kids, who usually pick at everything, devoured it. My husband, bless his heart, even went back for thirds. That was my “aha!” moment with homemade popcorn chicken.
It truly became a cornerstone of our family meals, especially on those busy weeknights when we need something quick, delicious, and universally loved. It’s perfect for little hands, great for dipping, and just generally makes everyone happy. This popcorn chicken recipe has rescued many a dinner, fueled countless movie nights, and been the star of more than a few impromptu gatherings.
It’s truly an easy chicken appetizer for any occasion. It’s also one of those dishes where, once you get the hang of it, you can totally customize it to your family’s taste. I’m so excited to share all my tips and tricks for making the best homemade popcorn chicken right in your own kitchen. You’re going to love it!
INGREDIENTS:
Alright, let’s get down to brass tacks – what you’ll need to create these little nuggets of joy. When I’m gathering everything for my homemade popcorn chicken, I always think about quality, but also about what’s easy to find at the grocery store. You don’t need any fancy-schmancy ingredients for this popcorn chicken recipe, just good, honest staples.
Here’s what I always have on hand for our favorite homemade popcorn chicken:
- 2 pounds boneless, skinless chicken breasts (or thighs, if you prefer, I’ll talk about that in a sec!)
- 1 cup all-purpose flour (for that classic crispy coating)
- 1/2 cup cornstarch (this is my secret for extra crispiness in my homemade popcorn chicken)
- 1 tablespoon smoked paprika (adds a lovely depth and color)
- 1 teaspoon garlic powder
- 1 teaspoon onion powder
- 1/2 teaspoon cayenne pepper (optional, for a little kick – we like ours with a tiny bit of heat!)
- 1 teaspoon salt
- 1/2 teaspoon black pepper
- 1 cup buttermilk (or milk mixed with a tablespoon of vinegar or lemon juice, if you’re in a pinch like I often am!)
- 2 large eggs
- Oil for frying (vegetable, canola, or peanut oil are all great choices for crispy chicken bites)
When making homemade popcorn chicken, I always use chicken breasts because they’re lean and cut up beautifully into those bite-sized pieces. However, a little kitchen wisdom I learned from my mom is that boneless, skinless chicken thighs actually stay even juicier during frying, so if you’re worried about dry fried chicken pieces, give those a try! You can find all these ingredients easily at your regular grocery store.
For the buttermilk, if you don’t have it, don’t sweat it! Just take regular milk (whole or 2%) and add a tablespoon of white vinegar or lemon juice, stir it, and let it sit for about 5-10 minutes until it looks slightly curdled. Voila! Instant buttermilk. This trick has saved me so many times when I’m halfway through a recipe and realize I’m out.
As for shopping tips, I often buy chicken breasts in bulk when they’re on sale and freeze them. Then, I just thaw what I need for my homemade popcorn chicken. It’s a great cost-saving tip and ensures I always have chicken ready for quick meals. Any leftover flour or spices can be stored right in your pantry, of course. For the oil, I typically buy a large jug of vegetable oil since I use it for so many things, including all my easy chicken appetizers.
HOW TO MAKE – STEP-BY-STEP:
Okay, sweet friend, this is where the magic happens! Don’t worry if you’ve never deep-fried before, or if your previous attempts at homemade popcorn chicken have been less than perfect. I promise you, this process is straightforward, and I’ll walk you through every step as if we’re standing side-by-side in my kitchen. We’re going to make the most delicious, crispy chicken bites you’ve ever tasted!
1. Prep the Chicken:
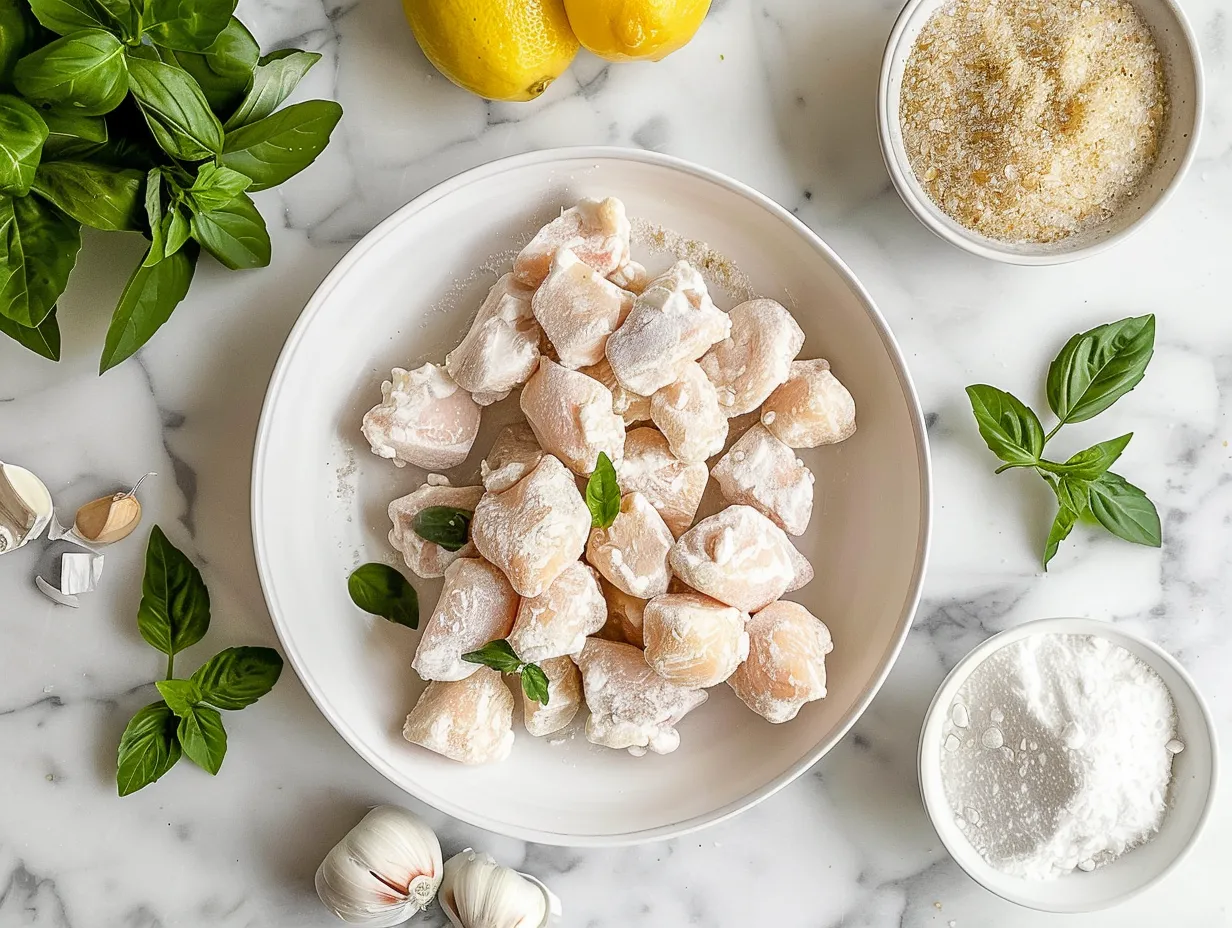
First things first, let’s get that chicken ready for our homemade popcorn chicken. Take your boneless, skinless chicken breasts and pat them really, really dry with paper towels. This is a crucial step for getting that super crispy coating, so don’t skip it! Then, slice them into bite-sized pieces, about 1-inch cubes. You want them relatively uniform in size so they cook evenly. If some are too big, they might not cook through, and if some are too small, they might dry out. So, aim for consistency!
2. Set up the Dredging Stations:
This is probably the most “assembly line” part of making homemade popcorn chicken, but it’s easy-peasy. Grab three shallow dishes or bowls.
- Dish 1 (Wet Mixture): In the first dish, whisk together the buttermilk and eggs until they’re well combined. This is our sticky base for the coating.
- Dish 2 (Dry Mixture): In the second dish, whisk together the all-purpose flour, cornstarch, smoked paprika, garlic powder, onion powder, cayenne pepper (if you’re using it), salt, and black pepper. Make sure there are no lumps and everything is evenly distributed. This is the flavor bomb for your homemade popcorn chicken!
- Dish 3 (Landing Zone): The third dish or a wire rack set over a baking sheet is where your coated chicken pieces will rest before frying. This helps the coating adhere properly.
3. Coat the Chicken:
Now for the fun part! Take a few pieces of chicken at a time (don’t overcrowd the bowl!) and dunk them into the wet buttermilk mixture, making sure they’re fully coated. Let any excess drip off. Then, transfer those wet pieces into the dry flour mixture. Really press the flour mixture onto each piece, ensuring it’s completely covered.
You want a good, thick coating for that satisfying crunch on your homemade popcorn chicken. Shake off any excess flour, and then place the coated chicken on your wire rack. Repeat with all the chicken pieces. While you’re doing this, I usually put on some of my favorite music, or if the kids are around, we might sing along to a silly song. It makes the time fly!
4. Heat the Oil:
This step requires a little patience and care. In a large, heavy-bottomed pot or a Dutch oven, pour in enough oil to reach about 2-3 inches deep. You want enough oil so the chicken pieces can be mostly submerged while frying. Place the pot over medium-high heat. I learned the hard way with homemade popcorn chicken that the oil temperature is absolutely critical
You need it to be around 350-375°F (175-190°C). If it’s too cool, your chicken will be greasy; too hot, and the outside will burn before the inside cooks. You can use a kitchen thermometer to check the temperature, which I highly recommend. Or, if you don’t have one, drop a tiny pinch of the flour mixture into the oil – if it sizzles and floats to the top immediately, it’s ready! For deep frying safety tips, I always refer to reliable sources like the Oklahoma State University Extension which has great advice here.
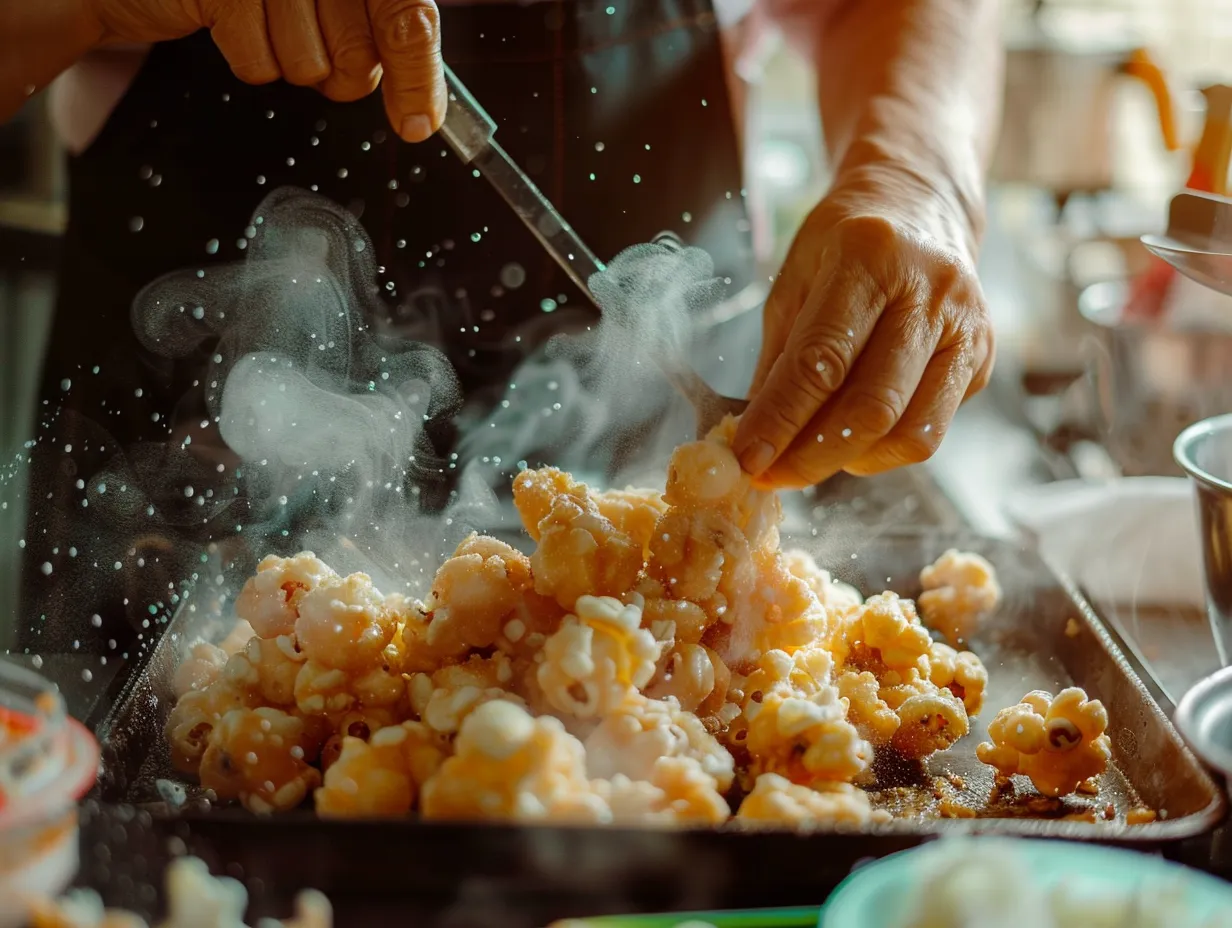
5. Fry the Chicken:
Once your oil is at temperature, carefully, and I mean carefully, lower a single layer of coated chicken pieces into the hot oil. Don’t overcrowd the pot! Frying in batches is key to keeping the oil temperature consistent and getting those wonderfully crispy chicken bites. Overcrowding drops the temperature and leads to soggy homemade popcorn chicken. Cook for about 5-7 minutes, turning occasionally with tongs, until the chicken is golden brown and cooked through. It’s always a good idea to check the internal temperature of a larger piece using an instant-read thermometer. It should reach 165°F (74°C) to be safely cooked. For safe minimum internal temperatures, the USDA provides a helpful chart.
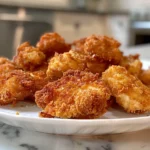
6. Drain and Serve:
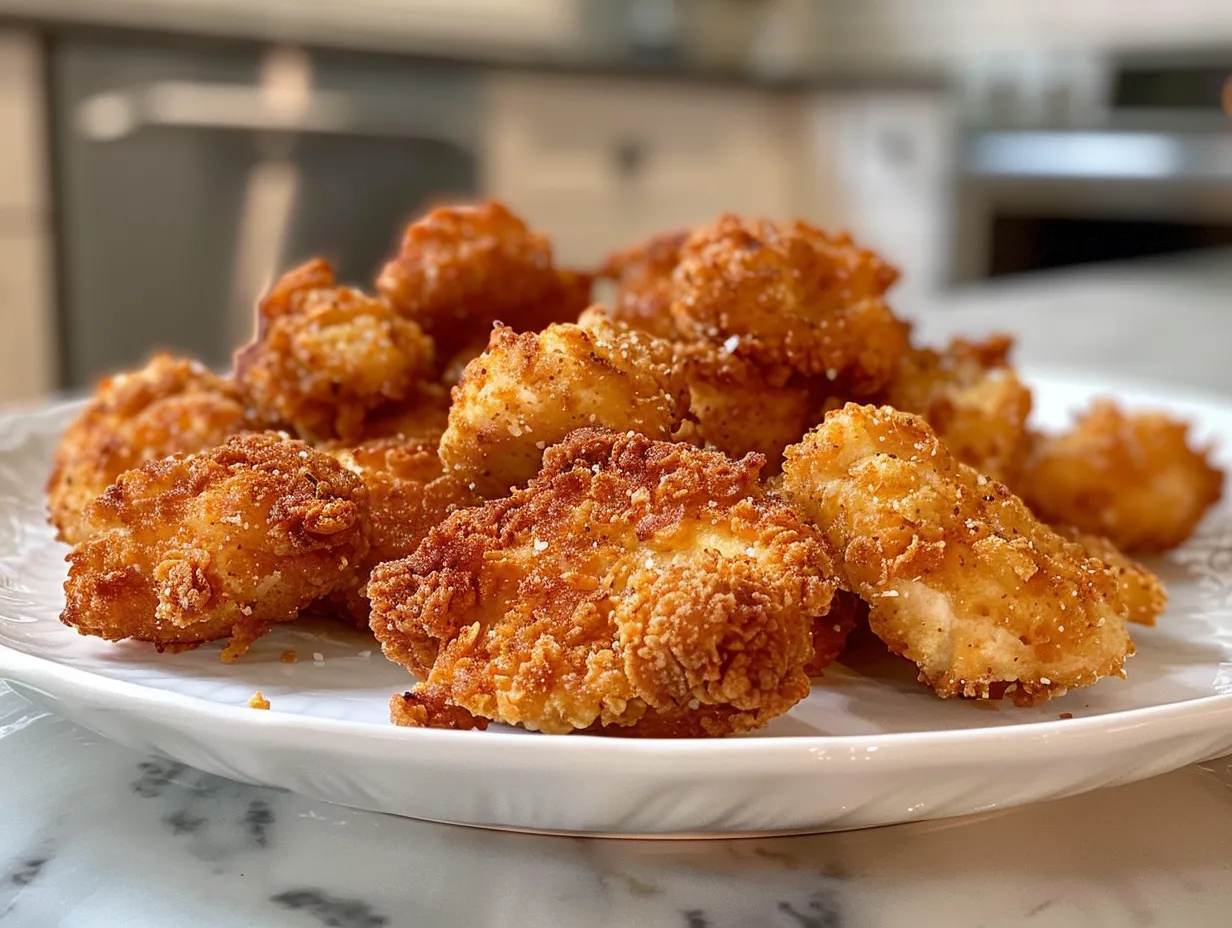
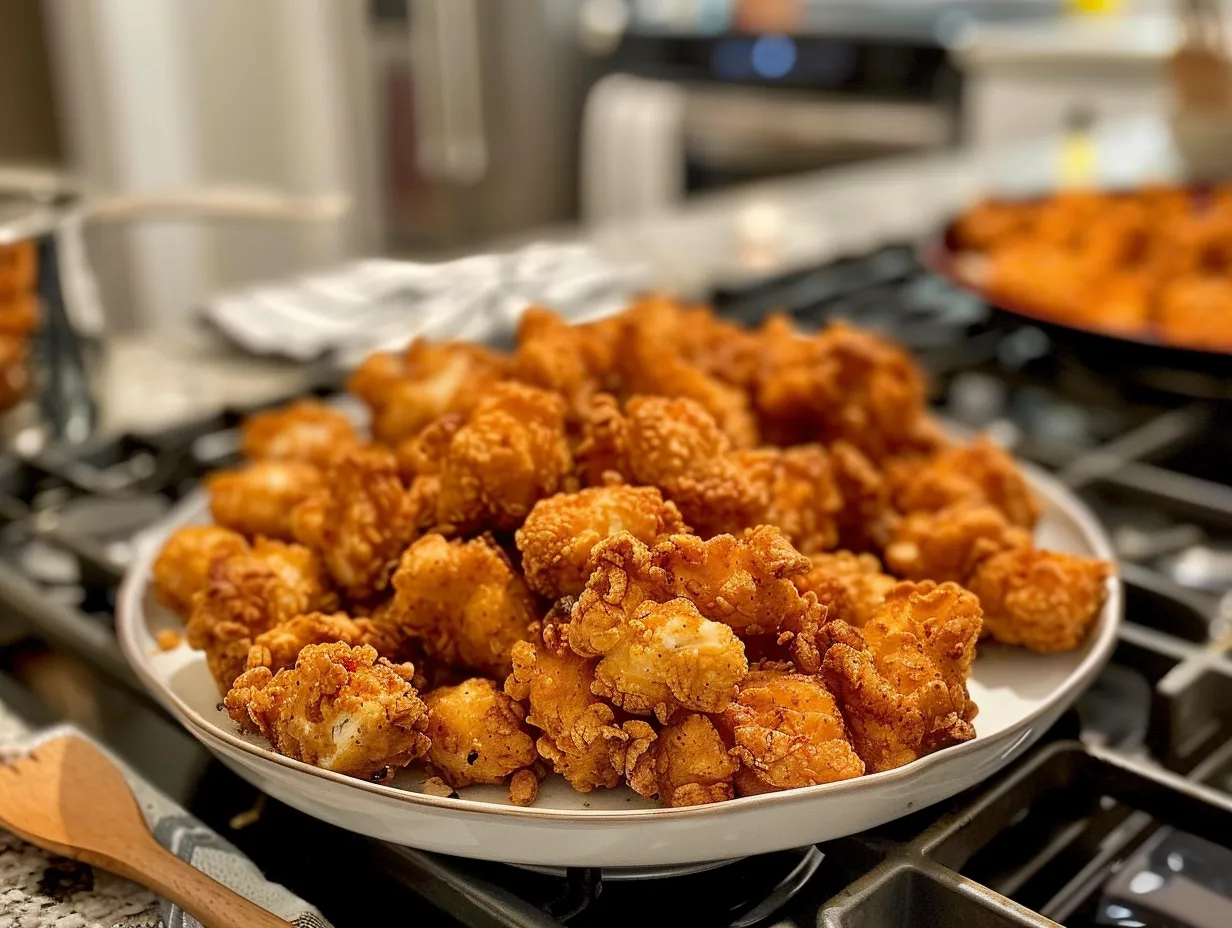
As each batch of homemade popcorn chicken finishes cooking, use a slotted spoon or spider strainer to remove the pieces from the oil. Transfer them to a wire rack set over a paper-towel-lined baking sheet. This allows any excess oil to drain off and helps keep the chicken crispy.
While the first batch is draining, your kitchen should smell amazing – that wonderful aroma of perfectly fried chicken! Repeat the frying process with the remaining chicken, making sure the oil comes back up to temperature between batches. In my kitchen, this usually takes about 25-30 minutes of active frying time once the oil is hot. Serve your delicious fried chicken pieces immediately with your favorite dipping sauces. These are truly the best!
SERVING:
Oh, this is the best part, friend – enjoying the fruits of your labor! There’s nothing quite like a fresh batch of homemade popcorn chicken straight from the fryer, still warm and wonderfully crispy. My family absolutely adores our homemade popcorn chicken when I serve it with a variety of dipping sauces. We usually lay out a little sauce bar with ketchup, ranch, honey mustard, and sometimes even a sweet chili sauce for the grown-ups. The kids love to mix and match and make it a fun experience. It’s a guaranteed way to get them excited about dinner!
For side dishes, I tend to keep things simple and classic. These crispy chicken bites pair beautifully with a fresh garden salad, some crisp coleslaw, or a big bowl of fluffy mashed potatoes. We also love serving it with a side of corn on the cob or some simple steamed green beans. Honestly, anything that doesn’t compete with the star of the show – that incredible homemade popcorn chicken – works perfectly. It’s comforting, satisfying, and feels like a special meal even on a Tuesday night.
This homemade popcorn chicken is perfect for so many occasions! It’s obviously fantastic for a casual family dinner, especially for a Friday movie night or game night. It’s also one of my go-to easy chicken appetizers for parties or get-togethers because it’s finger-food friendly and always a huge hit. I’ve even made big batches for birthday parties, and they disappear in minutes! For presentation, I usually serve it up in a big basket lined with some checkered paper, just like you’d get at a diner. It makes it feel extra fun and inviting.
If you happen to have any extra homemade popcorn chicken (which, let’s be real, is a rare occurrence in my house!), you can store leftovers in an airtight container in the fridge for 2-3 days. To reheat and keep them crispy, I recommend popping them in an air fryer or in the oven at 375°F (190°C) for about 10-15 minutes until heated through and crisp again. The microwave just won’t give you that same crunch, unfortunately!
I’ve experimented with seasonal variations too! In the summer, I might serve it alongside a fresh fruit salad or a light pasta salad. In the fall, a hearty potato salad or some roasted root vegetables. My friends always ask for this popcorn chicken recipe every time I bring it to a potluck. They’re convinced it’s complicated, but we know better, don’t we? It’s just good, honest, delicious cooking!
FAQs:
Oh, I know you’ve probably got some questions bubbling up, and believe me, I’ve asked (and answered!) them all over the years while perfecting this homemade popcorn chicken. Let’s chat through some of the most common ones I hear, both from my own family and from lovely readers like you!
Q1: My homemade popcorn chicken isn’t crispy enough! What am I doing wrong?
Oh, I’ve been there! It’s usually one of a few things. First, make sure your chicken pieces are really, really dry before you coat them. Any excess moisture will prevent the coating from sticking and getting crispy. Second, the oil temperature is key for this popcorn chicken recipe. If your oil isn’t hot enough (remember, 350-375°F!), the chicken will soak up too much oil and turn out greasy and soft instead of those perfect crispy chicken bites. Third, don’t overcrowd the pan! Frying in batches is super important to maintain that oil temperature. I made the mistake of trying to rush it once, and ended up with a sad, soggy batch – never again!
Q2: Can I bake or air fry this homemade popcorn chicken instead of deep frying?
You absolutely can! While deep frying gives you that classic, incredibly crispy texture, I totally get wanting a lighter option. For a baked version, after coating, place the chicken on a wire rack set over a baking sheet. Spray lightly with cooking spray and bake at 400°F (200°C) for 20-25 minutes, flipping halfway, until golden and cooked through. For air frying, preheat your air fryer to 400°F (200°C).
Spray the basket with cooking spray, arrange a single layer of coated chicken (don’t overlap!), and air fry for 10-15 minutes, shaking the basket halfway, until crisp and cooked. It won’t be quite the same as the fried version, but it’s still a delicious and easy chicken appetizer! My kids actually love our baked honey BBQ popcorn chicken too, which is a different spin: baked honey BBQ popcorn chicken.
Q3: What if I don’t have buttermilk?
No problem at all! I mentioned this briefly in the ingredients, but it’s such a common issue, I wanted to reiterate it here. You know what I do when my homemade popcorn chicken craving hits and I’m out of buttermilk? Just mix 1 cup of regular milk (any kind works, but whole or 2% is best) with 1 tablespoon of white vinegar or lemon juice. Stir it up and let it sit for about 5-10 minutes. It’ll thicken slightly and look a little curdled – that’s exactly what you want! It works beautifully as a substitute for this popcorn chicken recipe.
Q4: Can I make the homemade popcorn chicken ahead of time?
To get that ultimate crispiness, it’s best enjoyed fresh. However, you can definitely prep the chicken by cutting and coating it up to a few hours in advance. Just store the coated chicken on a wire rack set over a baking sheet, loosely covered with plastic wrap, in the fridge. This actually helps the coating adhere even better! But I wouldn’t fry it until you’re ready to serve for the best texture. If you have leftovers, as I mentioned, reheating in an air fryer or oven is your best bet to regain some of that crispiness.
Q5: My homemade popcorn chicken is bland! How can I add more flavor?
Oh no! That’s usually an easy fix. Make sure you’re generous with your seasonings in the flour mixture. If you like more kick, add extra cayenne or a pinch of smoked chipotle powder. Sometimes, I’ll add a teaspoon of dried herbs like oregano or thyme to the flour mixture for a different twist. You can also marinate the chicken in the buttermilk mixture for 30 minutes to an hour before dredging – this really infuses the chicken with flavor and makes it even more tender. My husband likes his extra spicy, so I often add a little more hot sauce to the buttermilk!
Q6: What kind of dipping sauces are best for these crispy chicken bites?
The world is your oyster when it comes to dipping sauces! For our homemade popcorn chicken, we love the classics: good old ketchup, creamy ranch dressing, and tangy honey mustard are always on the table. For something different, try a sweet chili sauce, a BBQ sauce (especially if you like that smoky flavor), or even a garlicky aioli. A zesty buffalo sauce is also a fantastic choice if you love a bit of heat. My daughter loves creating her own concoctions, mixing different dipping sauces together. It’s part of the fun!
Q7: Can I use different cuts of chicken for this popcorn chicken recipe?
Absolutely! While I usually use chicken breasts for my homemade popcorn chicken because they’re easy to cut into uniform pieces and cook quickly, boneless, skinless chicken thighs are also excellent. They tend to stay even juicier during frying due to their higher fat content. Just make sure to cut them into similar bite-sized pieces so they cook evenly. I’ve even seen people use tenders cut into smaller chunks, though I find breasts or thighs give the best “popcorn” shape.
My Final Thoughts:
Making homemade popcorn chicken isn’t just about putting dinner on the table; it’s about bringing joy and comfort to my family. This popcorn chicken recipe holds such a special place in my heart because it’s been the backdrop to so many happy memories – from busy weeknight dinners to relaxed movie nights, and even impromptu gatherings where it’s the first thing to disappear. It’s truly become a cornerstone of our kitchen.
Here are some of my homemade popcorn chicken Pro Tips for you, learned from years of trial and error (and a few delicious successes!):
- Don’t skimp on drying the chicken: Pat, pat, pat! Excess moisture is the enemy of crispiness.
- Trust your thermometer: Oil temperature is the secret to perfectly cooked, non-greasy homemade popcorn chicken.
- Fry in batches: Overcrowding lowers oil temperature, which means soggy results. Patience is a virtue here!
I’ve played around with a few homemade popcorn chicken variations over the years. We sometimes do a spicy homemade popcorn chicken by doubling the cayenne and adding a pinch of smoked chipotle powder to the flour mixture – my husband and I absolutely love this version. For the kids, especially my son, I’ve made a mild homemade popcorn chicken by omitting the cayenne altogether, keeping it super kid-friendly. And occasionally, when I’m feeling adventurous, I’ll even do a garlic-herb homemade popcorn chicken by adding dried thyme and oregano to the dry mixture, along with a little extra garlic powder. Each version brings its own delicious twist to these easy chicken appetizers.
I really hope you give this homemade popcorn chicken a try in your own kitchen. Don’t be afraid to make it your own – adjust the seasonings, try different dipping sauces, and find what your family loves most. Cooking should be an adventure, not a chore, and this popcorn chicken recipe is pure fun. I truly believe that some of the best moments happen around the dinner table, and I hope this homemade popcorn chicken brings as much happiness and deliciousness to your home as it does to mine. Happy cooking, sweet friend!
3 Genius Tips for Delicious Homemade Popcorn Chicken
Unlock the secret to perfectly crispy, juicy homemade popcorn chicken with these three genius tips! Skip the takeout and create a family favorite that’s packed with flavor and irresistible texture right in your own kitchen.
- Prep Time: 20 minutes
- Cook Time: 15 minutes
- Total Time: 35 minutes
- Yield: 4 servings
- Category: Snack
- Method: Fried
- Cuisine: American
Ingredients
- 1.5 lbs boneless, skinless chicken breast or thighs, cut into 1-inch pieces
- 1 cup buttermilk
- 1 teaspoon salt, divided
- ½ teaspoon black pepper, divided
- 1 teaspoon paprika
- ½ teaspoon garlic powder
- ½ teaspoon onion powder
- ¼ teaspoon cayenne pepper (optional)
- 2 cups all-purpose flour
- ½ cup cornstarch
- 2 large eggs
- 2 tablespoons water
- 4-6 cups vegetable oil, for frying
Instructions
- Tip 1: The Buttermilk Brine for Tenderness and Flavor. In a medium bowl, combine the cut chicken pieces, buttermilk, ½ teaspoon salt, and ¼ teaspoon black pepper. Stir to ensure all chicken is coated. Cover and refrigerate for at least 30 minutes, or up to 2 hours, for maximum tenderness and flavor infusion.
- While the chicken is marinating, prepare your dry coating. In a large, shallow dish, whisk together the all-purpose flour, cornstarch, ½ teaspoon salt, ¼ teaspoon black pepper, paprika, garlic powder, onion powder, and cayenne pepper (if using).
- In another shallow dish, whisk together the eggs and 2 tablespoons of water to create an egg wash.
- Tip 2: The Double-Coating Technique for Ultimate Crispiness. Working in batches, remove chicken pieces from the buttermilk (letting excess drip off) and first dredge them in the dry flour mixture, ensuring they are fully coated.
- Next, dip the floured chicken into the egg wash, allowing excess to drip off.
- Finally, return the chicken to the dry flour mixture for a second coating, pressing gently to ensure a thick, even crust. Place coated chicken on a wire rack set over a baking sheet to rest while you heat the oil. This helps the coating adhere.
- Tip 3: The Perfect Frying Temperature for Golden Perfection. In a large, heavy-bottomed pot or Dutch oven, pour enough vegetable oil to reach a depth of 2-3 inches. Heat the oil over medium-high heat until it reaches 350-375°F (175-190°C). Use a kitchen thermometer to ensure accuracy.
- Carefully lower a batch of coated chicken into the hot oil, ensuring not to overcrowd the pot. Fry for 4-6 minutes, or until golden brown and cooked through (internal temperature reaches 165°F / 74°C). The chicken should float to the top when done.
- Using a slotted spoon or spider, transfer the cooked popcorn chicken to a wire rack set over a baking sheet lined with paper towels to drain excess oil.
- Repeat with remaining chicken, ensuring the oil temperature returns to the desired range between batches. Serve hot with your favorite dipping sauces.
Notes
Serve your delicious homemade popcorn chicken with a variety of dipping sauces like honey mustard, BBQ, ranch, or a spicy sriracha mayo. It’s perfect as an appetizer, snack, or fun main course!