Alright, gather ’round, honey! Let me tell you about my family’s absolute favorite Friday night treat: chicken fajita pizza. Seriously, it’s a tradition. I can practically smell the sizzling peppers and onions now just thinking about it. This chicken fajita pizza recipe has been a lifesaver on those nights when I’m staring into the fridge, wondering what on earth to make with the leftover cooked chicken from Tuesday’s dinner. You know those nights, right?
The beautiful thing about this chicken fajita pizza is how easily it came about. One night, I was craving Mexican, and the kids wanted pizza. In my quest for making both happen, the fusion was born! I threw some leftover fajita veggies and chicken on a pre-made pizza crust with some Monterey Jack cheese and BOOM. That was the beginning!
There was definitely a learning curve. I remember one time, I piled the toppings way too high, and the crust was a soggy mess. We still ate it, of course, because, well, pizza! But that’s when I learned the importance of layering strategically and not overdoing the sauce. That, my friends, is kitchen wisdom earned the hard way!
This recipe has really become a cornerstone of my week. It’s one thing I know my family will not complain about. They ask for it, actually! And that makes this mama happy. It’s quick, relatively healthy (we can pretend, anyway!), and it uses up leftovers.
So, if you’re looking for a simple, crowd-pleasing meal that will make your weeknight dinner routine easier, stick around. This chicken fajita pizza recipe is about to become your new best friend. Come on, let’s get started, and I’ll show you how to make this Mexican-Italian fusion a reality in your kitchen! You can do it!
INGREDIENTS
Alright, let’s get down to brass tacks, shall we? Here’s what you’ll need to whip up this delicious chicken fajita pizza. Now, these are just my preferences, of course. Feel free to adjust things to your liking!
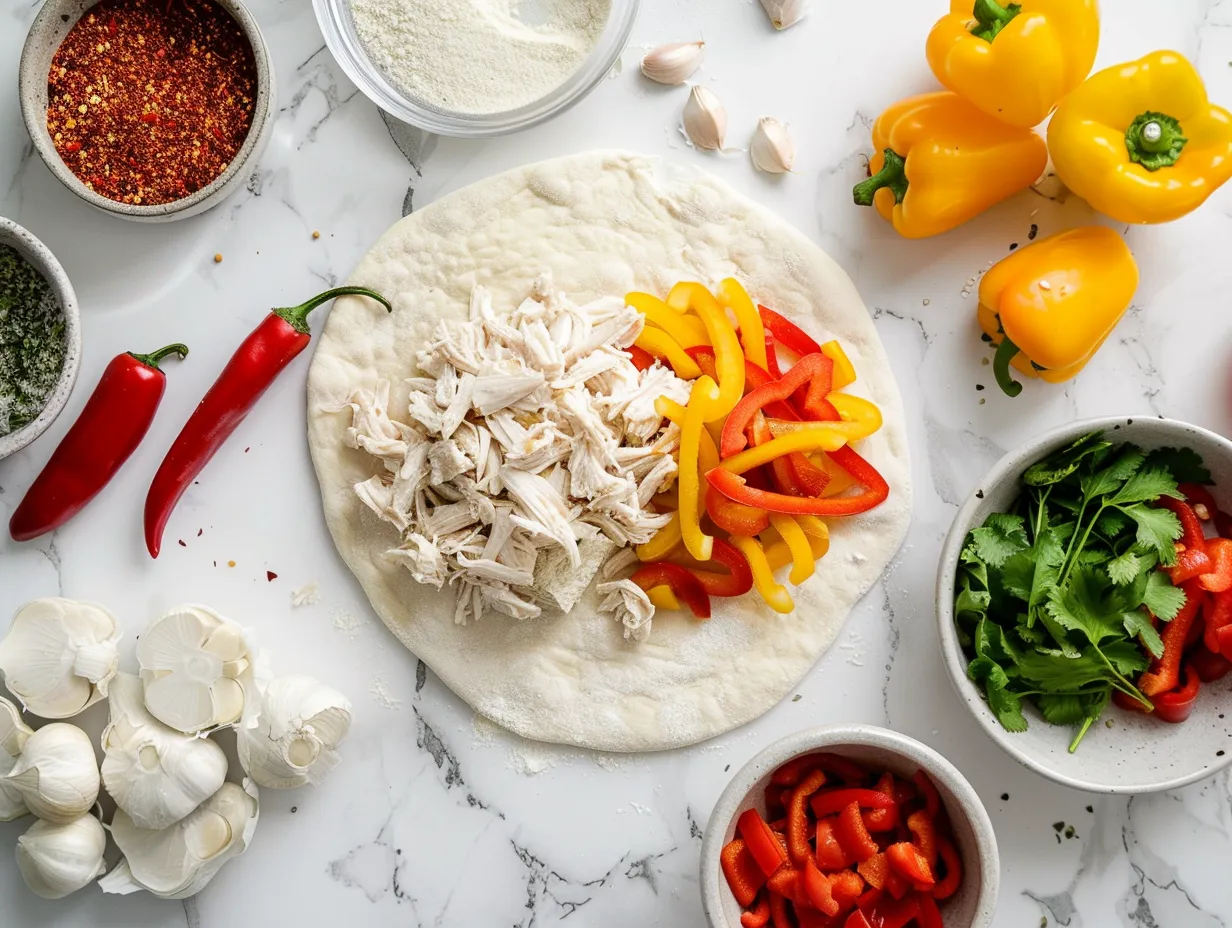
- 1 pound cooked chicken breast, cut into strips: I always use leftover grilled or roasted chicken for my chicken fajita pizza, but rotisserie chicken from the grocery store works great in a pinch.
- 1 large red bell pepper, thinly sliced: I love the sweetness the red pepper adds!
- 1 large green bell pepper, thinly sliced: Gotta have the green to balance things out, right?
- 1 large yellow onion, thinly sliced: When making chicken fajita pizza, make sure they are very thinly sliced so they cook evenly and meld well on the pizza.
- 1 tablespoon olive oil: For sautéing those lovely veggies.
- 1 packet fajita seasoning: You can use store-bought, or make your own! (See note at the end of ingredient list)
- 1 (12-inch) pre-made pizza crust: I usually go with a thin crust for this, but use whatever your family prefers.
- 1 cup salsa: Use your favorite kind! I often use a mild salsa for the kids, but I sneak in a bit of hot salsa just for me.
- 2 cups shredded Monterey Jack cheese: Melts like a dream!
- Optional toppings: Sliced black olives, diced tomatoes, sour cream, guacamole, fresh cilantro, and jalapenos.
- Non-stick cooking spray: A good spray on the pan to prevent sticking.
When making chicken fajita pizza, you can find the best bell peppers and onions at your local farmer’s market, especially in the summer and fall. And here’s a chicken fajita pizza trick I learned from my mom: she always adds a pinch of cumin to the sautéed vegetables for extra depth of flavor. I’ve been doing that ever since!
For a cost-saving tip, buy a whole chicken and roast it yourself. You can use the meat for this chicken fajita pizza and then use the carcass to make a delicious broth. Two meals in one!
Leftover chicken ingredients should be stored in an airtight container in the refrigerator for up to 3-4 days. Vegetables can be stored in the refrigerator for up to 5-7 days. If you have salsa left, always make sure it is sealed tightly to prevent drying.
Note: For homemade fajita seasoning, mix 1 tablespoon chili powder, 1 teaspoon cumin, 1 teaspoon paprika, ½ teaspoon garlic powder, ½ teaspoon onion powder, ¼ teaspoon oregano, ¼ teaspoon cayenne pepper (optional), and salt and pepper to taste. Mix it all in a bowl, and voila! You have homemade fajita seasoning, my friend!
HOW TO MAKE – STEP-BY-STEP
Okay, girl, let’s get cooking! Here’s how to make this mouthwatering chicken fajita pizza, step-by-step. Don’t worry, it’s super easy. And if you mess up, well, we’ve all been there. Pizza is still pizza!

- Preheat the oven to 400°F (200°C). While the oven is heating, lightly grease a pizza pan or baking sheet with non-stick cooking spray. This step is super important!
- Sauté the veggies: In a large skillet, heat the olive oil over medium heat. Add the sliced bell peppers and onions. Cook, stirring occasionally, until the vegetables are softened and slightly caramelized, about 8-10 minutes. Now, don’t rush this step. You want those veggies to be nice and tender. In my kitchen, chicken fajita pizza usually takes me about 8 minutes to saute the veggies.
- Season the veggies: Sprinkle the fajita seasoning over the cooked vegetables and stir to combine. Cook for another minute or two until fragrant. I learned the hard way with chicken fajita pizza that you need to add enough seasoning to really taste it!
- Prepare the crust: Place the pizza crust on the prepared pizza pan. Spread the salsa evenly over the crust, leaving a small border for the edge. Be careful not to use too much salsa, or the crust will get soggy. That’s never fun, right?
- Layer the toppings: Sprinkle about half of the Monterey Jack cheese over the salsa. This helps to create a cheesy base for the other toppings.
- Add the fajita mixture: Spread the sautéed bell peppers and onions evenly over the cheese. I like to make sure every slice gets a good amount of veggies!
- Top with chicken: Arrange the cooked chicken strips over the vegetables. I don’t know what I’d do if I didn’t have precooked chicken ready. What a time saver!
- Add the remaining cheese: Sprinkle the remaining Monterey Jack cheese over the chicken and vegetables. This creates a beautiful, melty topping.
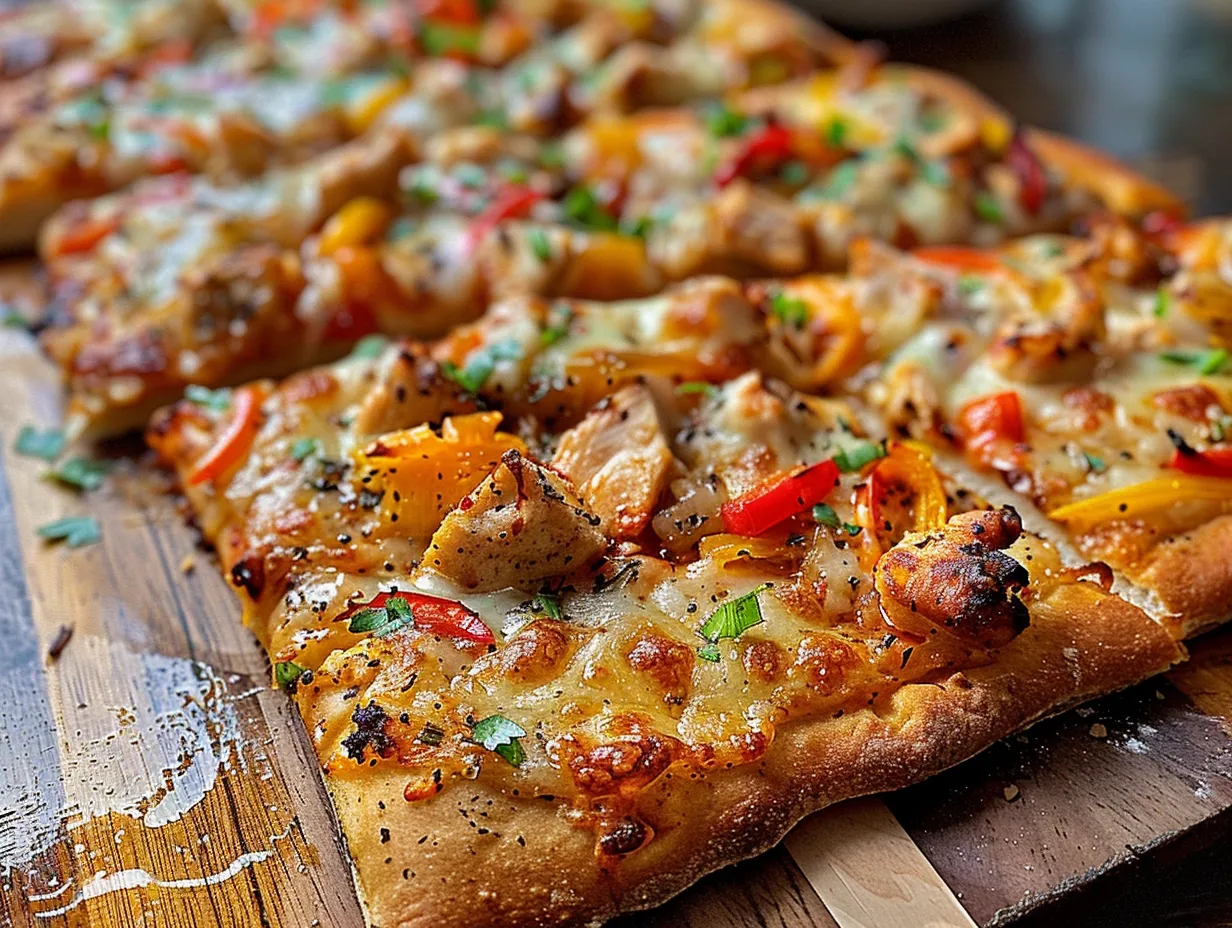
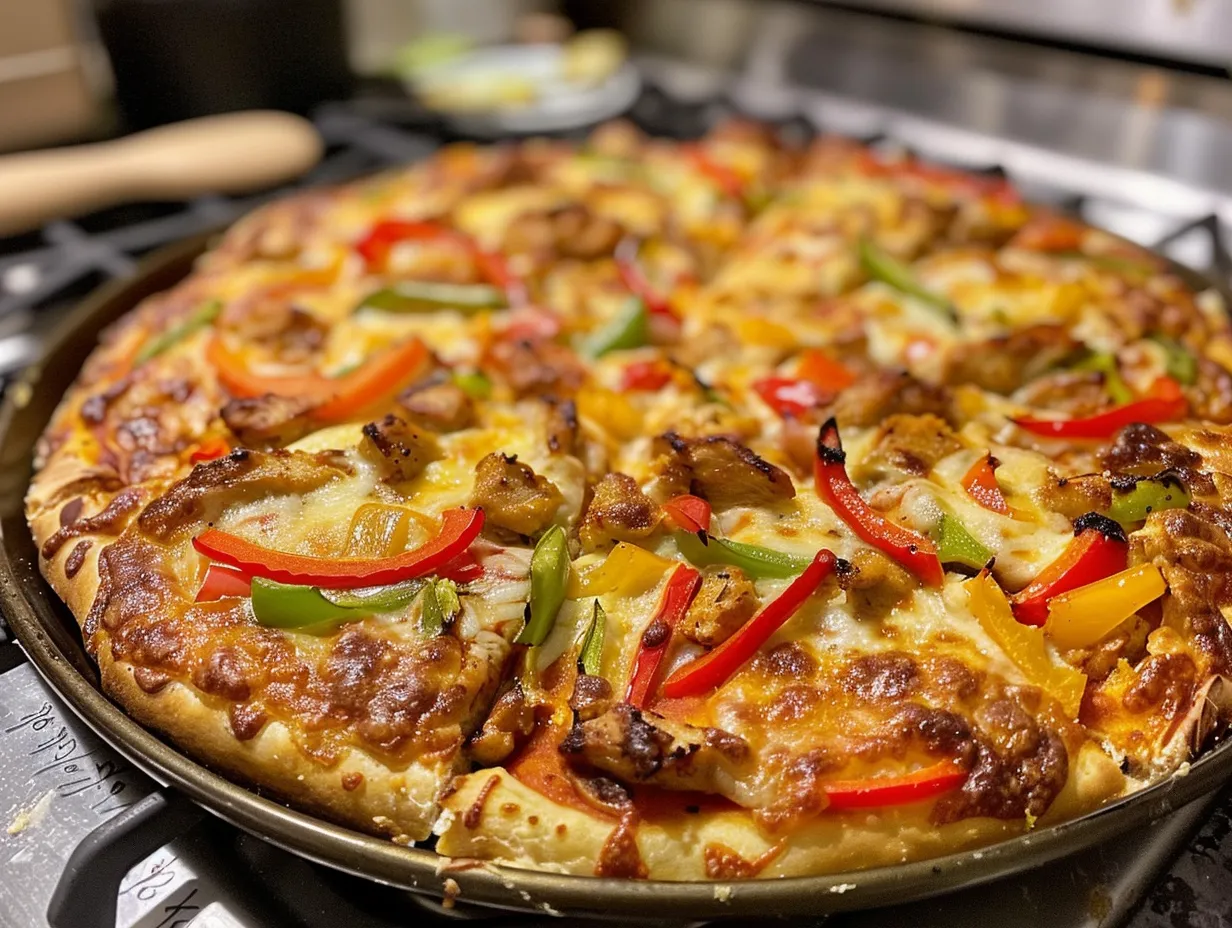
- Bake the pizza: Bake in the preheated oven for 12-15 minutes, or until the crust is golden brown and the cheese is melted and bubbly. Don’t worry if your chicken fajita pizza starts to get a little brown around the edges. That just means it’s getting nice and crispy! Your chicken fajita pizza should smell like a spicy, cheesy dream!
- Add optional toppings: Once the pizza is out of the oven, you can add any optional toppings you like, such as sliced black olives, diced tomatoes, a dollop of sour cream, a scoop of guacamole, or some fresh cilantro.
While the chicken fajita pizza is cooking, I usually throw together a quick salad or chop up some extra veggies to serve on the side. It makes it feel like a complete meal!
I use a pizza cutter to divide the chicken fajita pizza in slices to make it easier for everyone to grab. My family likes smaller slices! So that is exactly what I do.
SERVING
Alright, the chicken fajita pizza is out of the oven, smelling divine, and ready to be devoured! Now, how do you serve this beauty?
The kids love our chicken fajita pizza when I cut it into small squares and serve it with a side of carrot sticks and ranch dressing (don’t judge!). It’s all about getting those veggies in, right?
My go-to side dishes that pair with chicken fajita pizza are a simple green salad with a tangy lime vinaigrette or some Mexican rice. The acidity of the lime vinaigrette cuts through the richness of the pizza, and the rice adds a hearty element to the meal. I also like serving it with a side of black beans for some extra protein.
This chicken fajita pizza is perfect for a casual Friday night dinner, a game-day gathering, or even a fun pizza-making party with friends. It’s always a hit! When I have friends over, I like to set out all the toppings and let everyone customize their own slices. It’s a fun and interactive way to enjoy pizza together!
For chicken fajita pizza presentation tips, I like to sprinkle a little fresh cilantro and a drizzle of sour cream over the top. It adds a pop of color and a touch of elegance to an otherwise casual dish.
If you have extra chicken fajita pizza (which is rare in my house!), it’s delicious reheated the next day. I usually pop it in the microwave for a minute or two, or you can reheat it in the oven at 350°F (175°C) for about 5-7 minutes.
For seasonal chicken fajita pizza variations, I’ve tried adding roasted corn in the summer or butternut squash in the fall. It’s a fun way to mix things up and use seasonal ingredients!
My friends always ask for this chicken fajita pizza recipe whenever I make it for them. They love the combination of flavors and how easy it is to make. And honestly, who doesn’t love pizza?!
FAQs
Okay, let’s tackle some of those burning questions you might have about this chicken fajita pizza. I’ve been making this recipe for years, so I’ve definitely encountered a few hiccups along the way!
- Can I use a different type of cheese for this pizza?
You sure can, honey! While I love Monterey Jack for its melty goodness, cheddar, pepper jack, or even a Mexican cheese blend would work great. Just use whatever your family prefers. You know what I do when my chicken fajita pizza doesn’t have enough cheese? I add more!
- Can I make this pizza on a gluten-free crust?
Absolutely! Just use your favorite gluten-free pizza crust. Keep in mind that gluten-free crusts can sometimes be a bit drier, so you may want to add a little extra salsa or olive oil to keep things moist.
- Can I make this pizza vegetarian?
Of course! Just skip the chicken and load up on extra veggies. You could even add some black beans or corn for some extra protein. My family loves the veggie version of chicken fajita pizza, too!
- What if my pizza crust gets soggy?
Ah, the dreaded soggy crust! This usually happens if you use too much salsa or toppings. To avoid this, make sure you don’t overload the crust, and you can also pre-bake the crust for a few minutes before adding the toppings to help it crisp up. I learned that hard lesson when I first made chicken fajita pizza!
- Can I make this pizza ahead of time?
You can definitely prep the toppings ahead of time. Sauté the veggies and cook the chicken, then store them in the refrigerator until you’re ready to assemble the pizza. I wouldn’t recommend assembling the pizza too far in advance, as the crust can get soggy. I would wait to add the toppings for the chicken fajita pizza right before cooking.
- What if I don’t have fajita seasoning?
No problem! You can easily make your own fajita seasoning by mixing together chili powder, cumin, paprika, garlic powder, onion powder, oregano, cayenne pepper (optional), and salt and pepper to taste. There is a list of ingredient measurements above. So easy!
- Can I grill this pizza?
Oh yes, you can! Grilled pizza is amazing. Just preheat your grill to medium heat and place the pizza crust directly on the grill grates. Grill for a few minutes per side, until the crust is slightly charred. Then, remove from the grill, add the toppings, and return to the grill until the cheese is melted and bubbly. The smoky flavor of grilled chicken fajita pizza is divine!
My Final Thoughts:
This chicken fajita pizza recipe holds a special place in my heart because it’s a dish that brings my family together. It’s a guaranteed crowd-pleaser that’s perfect for any occasion. Plus, it’s so versatile and easy to customize to your liking. It’s a dish that’s been a fixture in our lives for years, and it’s something I hope to pass down to my children someday.
Here are a few of my chicken fajita pizza Pro Tips:
- Don’t overload the crust: Too many toppings can lead to a soggy pizza.
- Use high-quality cheese: The better the cheese, the meltier and more flavorful the pizza will be.
- Don’t be afraid to experiment: Try different toppings, sauces, and cheeses to find your perfect combination.
Here are a few chicken fajita pizza variations I’ve tried with my family:
- Spicy Chicken Fajita Pizza: Add some diced jalapenos or a dash of hot sauce to the salsa for a kick.
- BBQ Chicken Fajita Pizza: Use BBQ sauce instead of salsa and add some red onion and cilantro.
- Creamy Chicken Fajita Pizza: Spread a layer of cream cheese over the crust before adding the other toppings.
My son, Ben, loves the spicy chicken fajita pizza, while my daughter, Lily, prefers the classic version with just a sprinkle of cilantro.
I truly hope you give this chicken fajita pizza recipe a try. It’s a simple, delicious, and fun way to feed your family and friends. Remember, cooking is all about experimenting and having fun in the kitchen. Don’t be afraid to make mistakes, and most importantly, enjoy the process! I hope your chicken fajita pizza cooking experience is a joy. Happy cooking, my friend! You are going to be so happy that you gave this chicken fajita pizza recipe a try!
3-Ingredient Delicious Chicken Fajita Pizza

This 3-Ingredient Chicken Fajita Pizza is a quick and easy meal that’s perfect for busy weeknights. It combines the flavors of fajitas with the fun of pizza, using just a few simple ingredients.
- Prep Time: 5 minutes
- Cook Time: 15 minutes
- Total Time: 20 minutes
- Yield: 4 servings
- Category: Dinner
- Method: Baked
- Cuisine: Mexican-American
Ingredients
- 1 pre-made pizza crust
- 1 cup pre-cooked fajita seasoned chicken
- 1/2 cup shredded Mexican cheese blend
Instructions
- Preheat your oven according to the pizza crust package directions.
- Spread the fajita seasoned chicken evenly over the pizza crust.
- Sprinkle the shredded Mexican cheese blend over the chicken.
- Bake for the recommended time on the pizza crust package, or until the crust is golden brown and the cheese is melted and bubbly.
- Let cool slightly before slicing and serving.
Notes
For an extra kick, add a dollop of sour cream or salsa after baking. You can also add other toppings like bell peppers or onions before baking.