Let me share my absolute favorite easy slow cooker corned beef recipe, one that’s become a cherished part of our family traditions. I discovered this cooking method during one particularly hectic St. Patrick’s Day when I was juggling my daughter’s Irish dance recital and hosting dinner for the grandparents. I had always been intimidated by cooking corned beef, worried I’d end up with something too tough or too salty. But that day, my slow cooker became my saving grace, and I stumbled upon what has become our most requested family meal.
Speaking of secrets, I’ve learned through plenty of trial and error (and yes, a few memorable mishaps) that the key to perfect slow cooker corned beef lies in the layering of ingredients and the cooking time. If you’ve ever struggled with tough corned beef or vegetables that turn to mush, I promise this recipe will change everything. For busy families like mine, it’s a godsend – just imagine coming home to a perfectly cooked, tender corned beef that practically falls apart with your fork.
Before we dive into the recipe, let me tell you what makes this version special. Unlike my early attempts (which admittedly could have doubled as salt licks), I’ve perfected the balance of flavors and found ways to keep the meat tender while ensuring the vegetables maintain their integrity. If you’ve been looking for a foolproof way to make corned beef, or if you’re new to slow cooking, you’re in exactly the right place. I’ve even incorporated some tips I learned from testing various recipes for my blog, including this delicious Onion Beef Fried Rice that’s perfect for using up leftover corned beef.
Ready to create some kitchen magic? Let’s get cooking! I’m excited to share all my tried-and-true tips for making the most tender, flavorful slow cooker corned beef you’ve ever tasted.
Ingredients
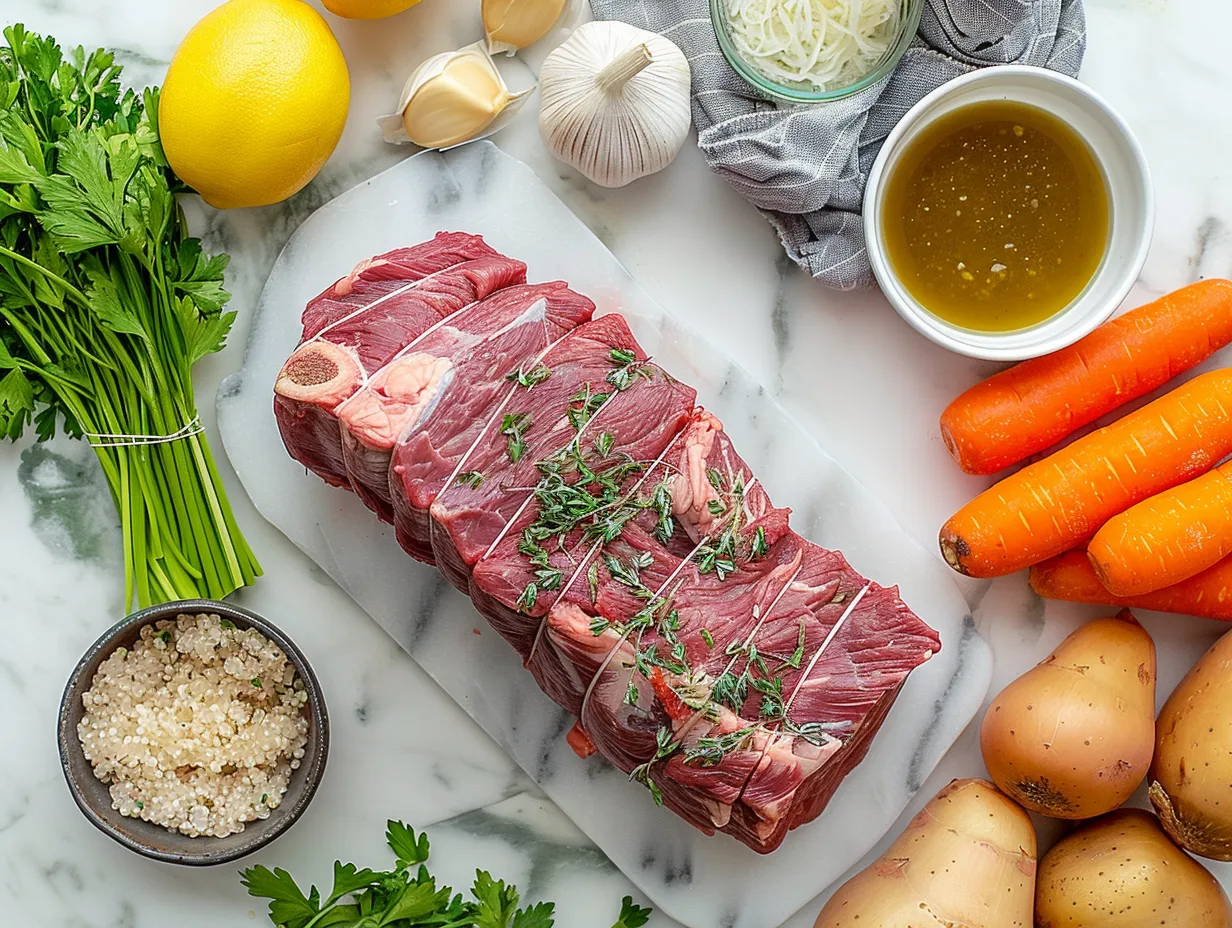
- 1 (4-5 pound) corned beef brisket with spice packet
- 6 medium red potatoes, quartered
- 4 large carrots, cut into 2-inch chunks
- 1 large yellow onion, cut into wedges
- 1 head of cabbage, cut into wedges
- 4 cloves garlic, minced
- 2 bay leaves
- 1 bottle (12 oz) dark beer (I use Guinness) *optional
- 2 cups water or beef broth
- 2 tablespoons brown sugar
- 1 tablespoon whole black peppercorns
Let me share some insider tips about these ingredients that I’ve learned over the years. When selecting your corned beef, I always look for a flat cut rather than a point cut – it tends to cook more evenly in the slow cooker. I love using Certified Angus Beef brand when I can find it, but any good quality corned beef will work beautifully.
For the vegetables, I’ve found that red potatoes hold their shape better than russet potatoes during the long cooking process. Speaking of vegetables, here’s a money-saving tip: buy your cabbage right after St. Patrick’s Day when it’s typically on sale, and freeze it for future use. Just remember to thaw it completely before cooking.
The beer is optional, but I find it adds an incredible depth of flavor. If you’re not using beer, simply replace it with additional beef broth. My mother-in-law taught me to add brown sugar – it helps balance the saltiness of the meat and creates a lovely glaze. Trust me on this one!
When it comes to storing ingredients, I keep my potatoes and onions in a cool, dark place (but never together – they can affect each other’s shelf life). The carrots stay crisp longer if you store them in water in the refrigerator. For more beef cooking inspiration, you might want to check out my Mississippi Beef and Noodles recipe too.
Step-by-Step Instructions
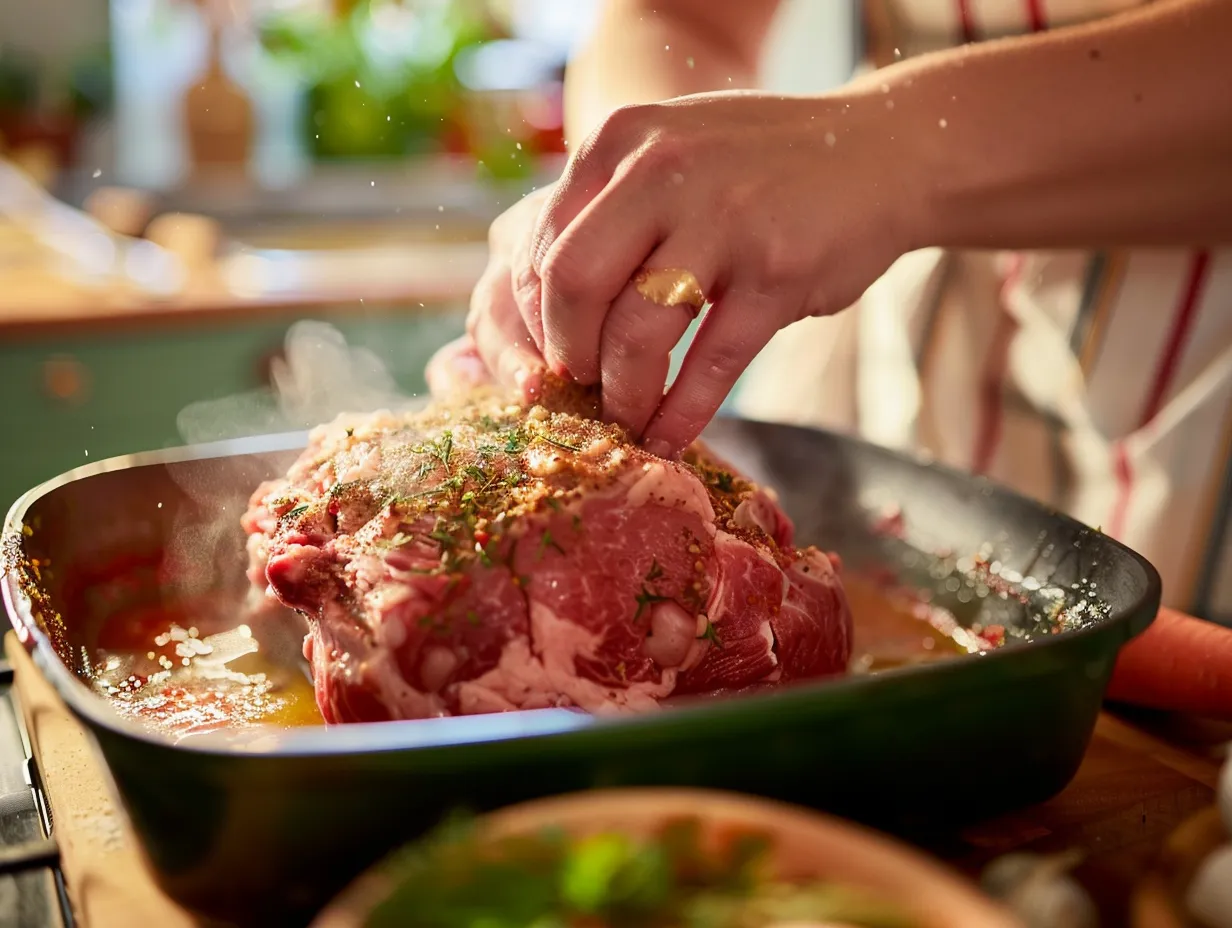
- Begin by rinsing your corned beef under cold water. This is a step I learned the hard way – it helps remove excess salt and ensures your final dish won’t be too salty. Pat it dry with paper towels.
- Layer your vegetables strategically in the slow cooker. I start with the onions and carrots on the bottom, as they can withstand the longest cooking time without becoming mushy. Make sure your slow cooker is at least 6 quarts – trust me, you’ll need the space! For safe cooking guidelines, you can refer to the USDA Food Safety Guidelines for Corned Beef.
- Place the corned beef on top of the vegetables, fat side up. This is crucial – the fat will render down during cooking, keeping the meat moist and adding flavor to the vegetables below. Sprinkle the contents of the spice packet over the meat.
- Add the minced garlic, bay leaves, and peppercorns around the meat. Pour in the beer (if using) and water or broth. The liquid should come about halfway up the sides of the meat – you don’t want to completely submerge it.
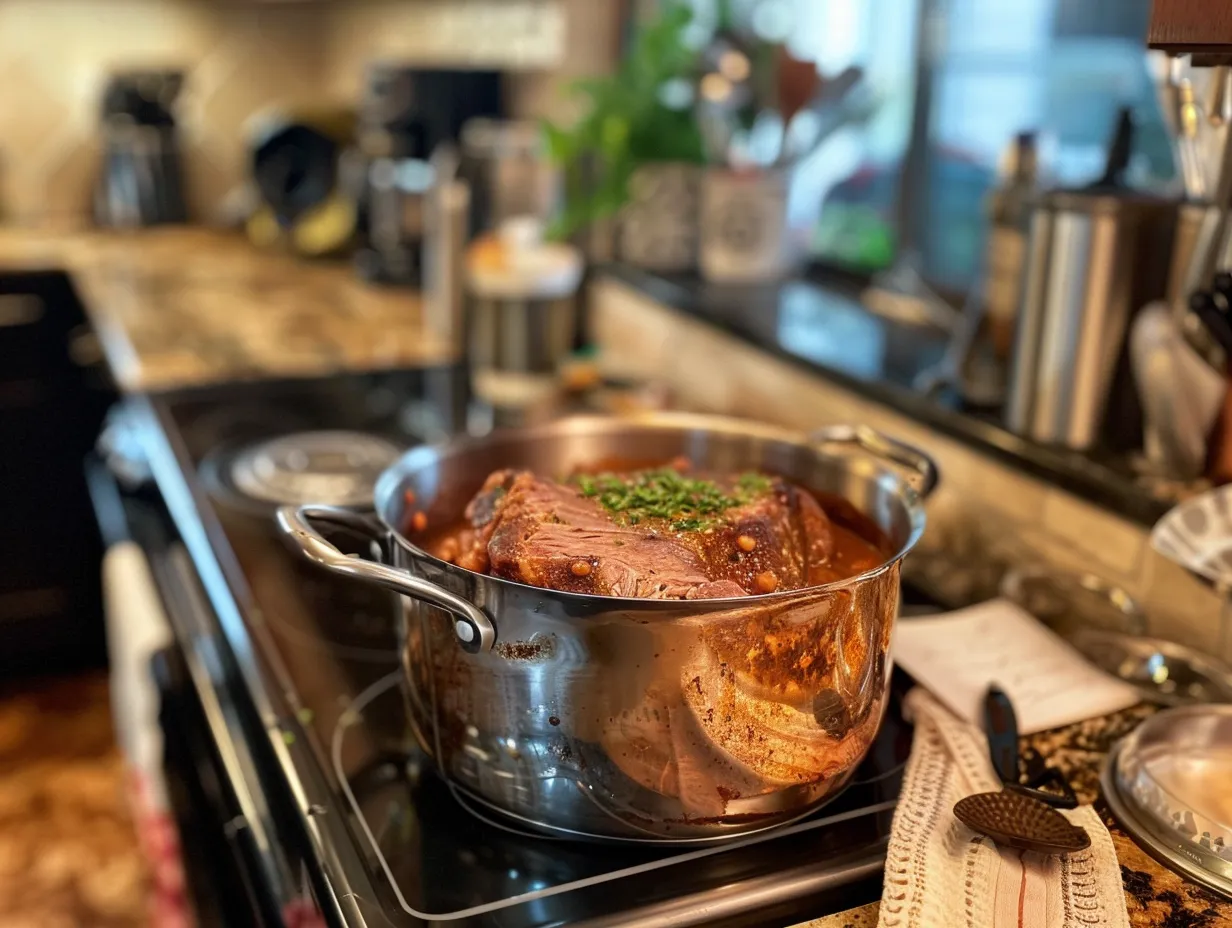
- Cover and cook on LOW for 8-10 hours. I know it’s tempting to peek, but resist opening the lid during the first 7 hours of cooking. Each time you lift the lid, you lose about 20 minutes of cooking time.
- When there’s about 1 hour left in the cooking time, add the cabbage wedges on top. They’ll steam perfectly in that last hour without becoming overdone. This timing trick took me several attempts to perfect!
- You’ll know the corned beef is done when it’s fork-tender and easily pulls apart. The internal temperature should reach at least 145°F (63°C) for food safety. I always use a meat thermometer to check – no guessing games in my kitchen!
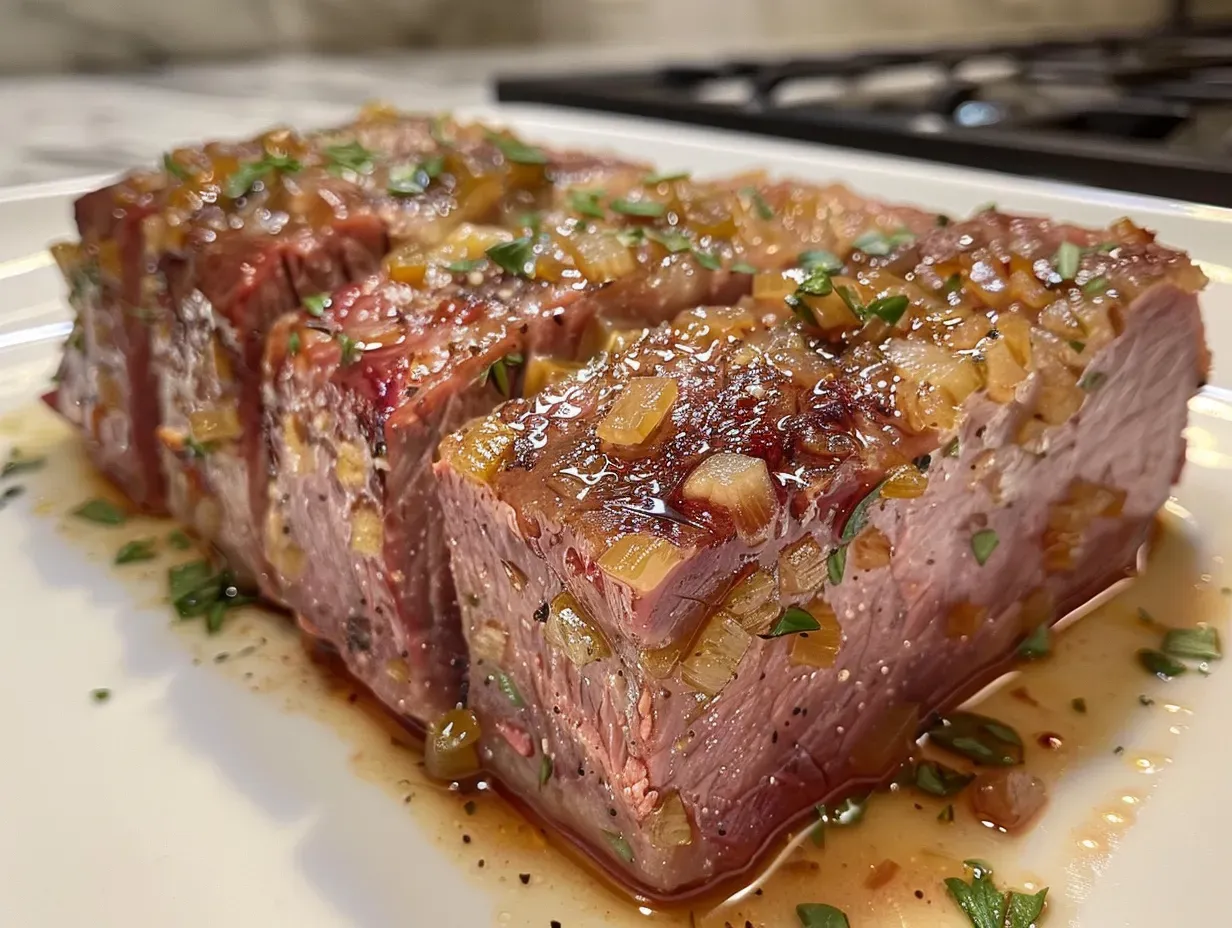
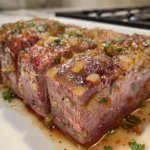
- Once done, remove the meat and let it rest for 15-20 minutes before slicing. This resting period is crucial for keeping the meat juicy. Always slice against the grain for the most tender result.
Serving Ideas
Oh, let me tell you about all the wonderful ways to serve this delicious corned beef! In my house, we love to present it on a large platter with the vegetables arranged around the sliced meat. It makes for such a gorgeous presentation that always draws “oohs” and “aahs” from guests.
For a traditional approach, I serve it with a side of whole grain mustard and horseradish sauce. My kids weren’t fans of horseradish at first, but I created a milder version by mixing it with a bit of sour cream, and now they love it! You might want to check out some serving suggestions from Slow-Cooker Corned Beef recipe for more inspiration.
If you’re serving a crowd, I’ve found that setting up a build-your-own sandwich station is always a hit. I put out rye bread, Swiss cheese, sauerkraut, and Russian dressing so people can make their own Reuben sandwiches. It’s become such a popular option at our St. Patrick’s Day gatherings that friends now specifically request it!
For leftovers (if you’re lucky enough to have any), I love to dice up the corned beef and potatoes for a fantastic breakfast hash. Top it with a fried egg, and you’ve got a breakfast that will keep you going all morning. The meat also freezes beautifully – just wrap it well and it’ll keep for up to 3 months.
FAQs
Q: Why is my corned beef tough?
A: Oh, I’ve been there! The most common reason is not cooking it long enough. Unlike other cuts of meat, corned beef needs a long, slow cooking process to break down the tough muscle fibers. If it’s tough, let it cook for another hour or two – patience is key here!
Q: Can I cook this on HIGH instead of LOW?
A: While you technically can (about 4-5 hours on HIGH), I strongly recommend using the LOW setting. I learned through experience that the meat turns out much more tender this way. As my grandmother always said, “Good things come to those who wait!”
Q: What can I substitute for beer?
A: You can simply use additional beef broth or water. Sometimes I add a tablespoon of apple cider vinegar to help tenderize the meat and add depth to the flavor. For more variations, you might want to check out Allrecipes’ Slow Cooker Corned Beef and Cabbage.
Q: My vegetables are too mushy. What am I doing wrong?
A: This was my biggest challenge when I first started! The key is layering – put the hardier vegetables (carrots, onions) at the bottom and add the cabbage during the last hour of cooking.
Q: Can I prep this the night before?
A: Absolutely! I often prep all the vegetables the night before and store them in separate containers in the fridge. In the morning, I just layer everything in the slow cooker and turn it on.
Q: How do I know which way the grain runs to slice it properly?
A: Look at the meat carefully – you’ll see lines running in one direction. That’s the grain. Slice perpendicular to those lines. When in doubt, do a test slice!
Q: How long can I store leftovers?
A: Properly stored in an airtight container, leftovers will keep in the refrigerator for 3-4 days. They’re perfect for sandwiches or that breakfast hash I mentioned!
My Final Thoughts
You know what I love most about this slow cooker corned beef recipe? It’s how it brings people together. Whether it’s for St. Patrick’s Day or just a cozy Sunday dinner, there’s something magical about gathering around a table with this comforting meal at its center. Over the years, this recipe has become more than just instructions on a page – it’s become a part of our family’s story.
Pro Tip #1: Always let your meat rest for at least 15 minutes before slicing – it makes all the difference in keeping the meat juicy.
Pro Tip #2: Save the cooking liquid! It’s perfect for making soup or cooking cabbage later in the week.
Pro Tip #3: If you’re serving a crowd, you can keep the sliced meat warm in the slow cooker on the “warm” setting for up to 2 hours.
I’ve tried countless variations over the years – sometimes adding parsnips for extra sweetness, experimenting with different beers, or even adding a touch of maple syrup instead of brown sugar. Each version has its own charm, but this recipe I’ve shared today is the one my family requests again and again.
The beauty of this recipe is that it’s nearly foolproof, yet it delivers results that will make you feel like a kitchen pro. Whether you’re making it for your first St. Patrick’s Day celebration or it’s become a regular in your meal rotation, I’d love to hear how you make it your own. Remember, the best recipes are the ones that create memories around your table.
Happy cooking, friends! May your corned beef be tender and your memories be sweet.
PrintEasy Slow Cooker Corned Beef Recipe
This 3-step Dr Pepper ice cream recipe is easy and quick!
- Prep Time: 10
- Cook Time: 20
- Total Time: 30
- Yield: 6 servings
- Category: Dessert
- Method: Freezing
- Cuisine: American
Ingredients
- 1 (12 ounce) can Dr Pepper
- 1 (14 ounce) can sweetened condensed milk
- 2 cups heavy whipping cream
Instructions
- Pour Dr Pepper into a saucepan and bring to a boil. Reduce heat to medium-low and simmer for 15-20 minutes, or until reduced to 1/2 cup. Let cool completely.
- In a large bowl, combine the cooled Dr Pepper reduction and sweetened condensed milk.
- In a separate bowl, whip the heavy cream until stiff peaks form. Gently fold the whipped cream into the Dr Pepper mixture. Pour into a freezer-safe container and freeze for at least 6 hours, or preferably overnight.
Notes
For a stronger Dr Pepper flavor, reduce the soda to 1/4 cup. Make sure the Dr Pepper reduction is completely cooled before mixing.